The tikzpicture environment: options, scaling and centring
Quick answer
tikzpicture is the LaTeX environment that holds a TikZ drawing: \begin{tikzpicture}[options] … \end{tikzpicture}. Options in its square brackets, such as thick, scale=2 or every node/.style={…}, apply to everything inside, and TikZ makes the picture just big enough for the coordinates it contains. The picture sits in the text like one large letter; to centre it and give it a caption, put it in a figure environment with \centering and \caption.
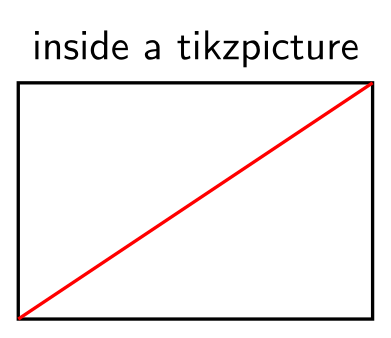
\usepackage{tikz}\begin{tikzpicture}[thick, every node/.style={font=\sffamily}]
\draw (0,0) rectangle (3,2);
\draw[red] (0,0) -- (3,2);
\node[above] at (1.5,2) {inside a tikzpicture};
\end{tikzpicture}Full document
\documentclass[border=4pt]{standalone}
\usepackage{tikz}
\begin{document}
\begin{tikzpicture}[thick, every node/.style={font=\sffamily}]
  \draw (0,0) rectangle (3,2);
  \draw[red] (0,0) -- (3,2);
  \node[above] at (1.5,2) {inside a tikzpicture};
\end{tikzpicture}
\end{document}Contents
How the environment works
The tikzpicture environment is the outermost scope of every TikZ drawing. When LaTeX reaches it, TikZ reads the options, runs the commands inside and collects what they draw in a box, which then goes into your text. A few rules follow from that:
- Drawing commands only work inside it.
\draw,\nodeand\pathare defined only within a picture; the one TikZ command that belongs outside is\tikzset. - Loose text is swallowed. Text typed between the commands is suppressed (TikZ switches to an empty font), so put words in a node:
\node at (1,0.5) {Text};. - The size comes from the coordinates. Every coordinate TikZ meets enlarges the bounding box, and the box is the size of the picture. Curve control points count too, which is why some pictures look off-centre (see below).
- Options are local. Whatever you set in the brackets, or anywhere inside, ends at
\end{tikzpicture}.
For a picture of one or two commands there is the short form \tikz[options] \draw …; (several commands go in braces: \tikz{\draw …; \fill …;}). It does exactly what the environment does, and it is the usual way to put a small drawing in a line of text.
Options you will use most
Any TikZ option can go after \begin{tikzpicture}; these are the ones that make most sense for a whole picture.
| Option | What it does |
|---|---|
scale=2, xscale, yscale | Multiplies every coordinate; line widths and text keep their size (next section) |
x=1.5cm, y=1cm | Sets the length of the unit vectors (1 cm by default), so (2,1) means 3 cm right and 1 cm up |
thick, line width=1pt, dashed, blue | Defaults for every path in the picture |
every node/.style={…} | Options added to every node, for example {font=\sffamily} or {draw, circle} |
name/.style={…} | Defines your own style for this picture; use it like any option (\draw[name] …) |
transform shape | Makes scale and rotate apply to nodes and their text as well |
baseline=… | Where the picture sits relative to the baseline of the surrounding text (inline pictures, below) |
To give every picture in a document the same options, set the every picture style once in the preamble, for example \tikzset{every picture/.style={line width=0.6pt}}, and define shared styles the same way: \tikzset{box/.style={draw, rounded corners}}. The manual warns against setting options directly, as in \tikzset{line width=1pt}: that does not work, because TikZ resets such values in many places.
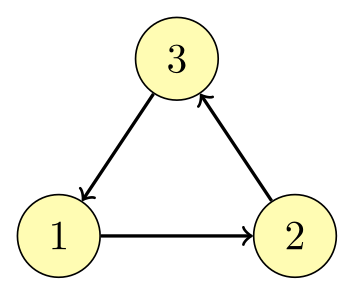
\usepackage{tikz}\begin{tikzpicture}[
every node/.style={draw, circle, fill=yellow!30, minimum size=7mm},
link/.style={->, thick}]
\node (a) at (0,0) {1};
\node (b) at (2,0) {2};
\node (c) at (1,1.5) {3};
\draw[link] (a) -- (b);
\draw[link] (b) -- (c);
\draw[link] (c) -- (a);
\end{tikzpicture}Full document
\documentclass[border=4pt]{standalone}
\usepackage{tikz}
\begin{document}
\begin{tikzpicture}[
    every node/.style={draw, circle, fill=yellow!30, minimum size=7mm},
    link/.style={->, thick}]
  \node (a) at (0,0) {1};
  \node (b) at (2,0) {2};
  \node (c) at (1,1.5) {3};
  \draw[link] (a) -- (b);
  \draw[link] (b) -- (c);
  \draw[link] (c) -- (a);
\end{tikzpicture}
\end{document}Scaling a tikzpicture: scale, transform shape or \resizebox
There are three ways to make a picture bigger or smaller, and they differ in what they scale. The same drawing, a 2 × 1 rectangle with a text node, is shown below with each of them, and all four pictures on this page are displayed at the same magnification:
| Method | Coordinates | Text in nodes | Line widths |
|---|---|---|---|
[scale=2] | × 2 | Unchanged | Unchanged |
[scale=2, transform shape] | × 2 | × 2 | Unchanged |
\resizebox{4cm}{!}{…} or \scalebox{2}{…} | × 2 | × 2 | × 2 |
[x=2cm, y=2cm] | × 2 (only coordinates without units) | Unchanged | Unchanged |
scale is a coordinate transformation: TikZ multiplies the coordinates and then draws with the normal line width and font, so the text stays the size of your document’s text. That is usually what you want; the manual itself says that text should rarely be scaled. You can also give scale to a single \draw or a scope to scale only part of a picture.
transform shape applies the current scale (and rotation) to nodes too, so their text and shapes grow with the picture. Use it for diagrams that should keep their proportions exactly.
\resizebox and \scalebox come from the graphicx package and scale the finished box like an image: lines get thicker and the text grows or shrinks with everything else. \resizebox{\linewidth}{!}{…} is the quick way to make a wide picture fit the text width (! keeps the aspect ratio), at the price of a font size that no longer matches your document. If you use it in running text, put \noindent before it: otherwise the paragraph indent makes the line wider than \linewidth and LaTeX reports an overfull box. Inside a figure there is no indent.
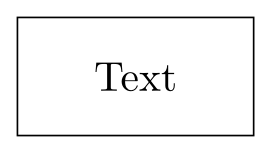
\usepackage{tikz}\begin{tikzpicture}
\draw (0,0) rectangle (2,1);
\node at (1,0.5) {Text};
\end{tikzpicture}Full document
\documentclass[border=4pt]{standalone}
\usepackage{tikz}
\begin{document}
\begin{tikzpicture}
  \draw (0,0) rectangle (2,1);
  \node at (1,0.5) {Text};
\end{tikzpicture}
\end{document}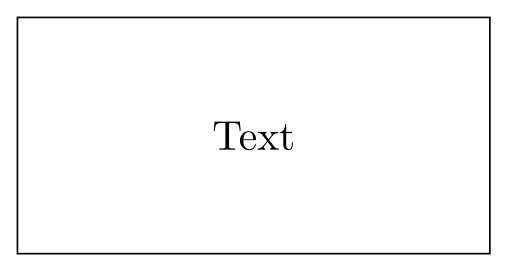
\usepackage{tikz}\begin{tikzpicture}[scale=2]
\draw (0,0) rectangle (2,1);
\node at (1,0.5) {Text};
\end{tikzpicture}Full document
\documentclass[border=4pt]{standalone}
\usepackage{tikz}
\begin{document}
\begin{tikzpicture}[scale=2]
  \draw (0,0) rectangle (2,1);
  \node at (1,0.5) {Text};
\end{tikzpicture}
\end{document}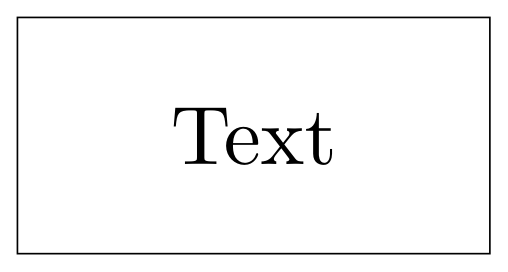
\usepackage{tikz}\begin{tikzpicture}[scale=2, transform shape]
\draw (0,0) rectangle (2,1);
\node at (1,0.5) {Text};
\end{tikzpicture}Full document
\documentclass[border=4pt]{standalone}
\usepackage{tikz}
\begin{document}
\begin{tikzpicture}[scale=2, transform shape]
  \draw (0,0) rectangle (2,1);
  \node at (1,0.5) {Text};
\end{tikzpicture}
\end{document}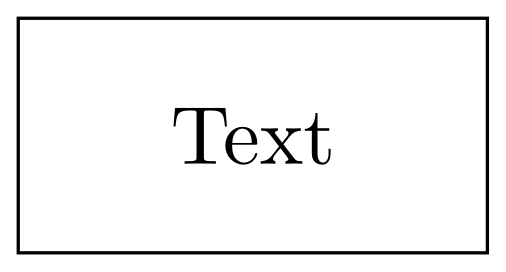
\usepackage{tikz} \usepackage{graphicx}\resizebox{4cm}{!}{%
\begin{tikzpicture}
\draw (0,0) rectangle (2,1);
\node at (1,0.5) {Text};
\end{tikzpicture}%
}Full document
\documentclass[border=4pt]{standalone}
\usepackage{tikz}
\usepackage{graphicx}
\begin{document}
\resizebox{4cm}{!}{%
  \begin{tikzpicture}
    \draw (0,0) rectangle (2,1);
    \node at (1,0.5) {Text};
  \end{tikzpicture}%
}
\end{document}How to centre a tikzpicture and give it a caption
A tikzpicture on its own line is placed like the first word of a paragraph, at the left margin plus the paragraph indent. To centre it, number it and caption it, use a figure:
- Put the
tikzpictureinside afigureenvironment, such as\begin{figure}[htbp]. LaTeX floats the figure to a good place: here (h), the top (t) or bottom (b) of a page, or a page of floats (p). - Write
\centeringstraight after\begin{figure}. It centres everything in the figure without the extra vertical space that thecenterenvironment adds. - Write
\caption{…}after the picture for a caption below it, and\label{fig:…}after the caption. - Refer to it in the text with
Figure~\ref{fig:…}; LaTeX fills in the number when you compile again.
\documentclass{article}
\usepackage{tikz}

\begin{document}
As Figure~\ref{fig:box} shows, a tikzpicture can go in a figure.

\begin{figure}[htbp]
  \centering
  \begin{tikzpicture}
    \draw (0,0) rectangle (3,2);
    \node at (1.5,1) {A box};
  \end{tikzpicture}
  \caption{A TikZ picture in a figure, with a caption.}
  \label{fig:box}
\end{figure}
\end{document}
Outside a figure, \begin{center} … \end{center} centres a picture in the running text, with some space above and below. Two pictures in one figure sit side by side like two words; separate them with \hfill or \quad.
When a centred picture still looks off-centre
TikZ centres the picture’s bounding box, and the bounding box is built from every coordinate it met, including the control points of curves, which can lie well outside the curve. In the first picture below the dashed frame shows the box: the curve peaks at 1.5 cm but its control points are at 2 cm. Invisible coordinates, such as a \coordinate far away, enlarge the box in the same way. Fix it by declaring the box yourself with \useasboundingbox (short for \path[use as bounding box]) before drawing: everything after it is treated as if it were clipped to that box, without being clipped.
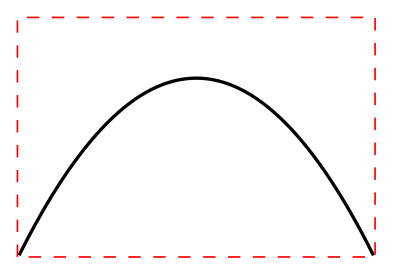
\usepackage{tikz}\begin{tikzpicture}
\draw[thick] (0,0) .. controls (1,2) and (2,2) .. (3,0);
\draw[red, dashed] (current bounding box.south west)
rectangle (current bounding box.north east);
\end{tikzpicture}Full document
\documentclass[border=4pt]{standalone}
\usepackage{tikz}
\begin{document}
\begin{tikzpicture}
  \draw[thick] (0,0) .. controls (1,2) and (2,2) .. (3,0);
  \draw[red, dashed] (current bounding box.south west)
    rectangle (current bounding box.north east);
\end{tikzpicture}
\end{document}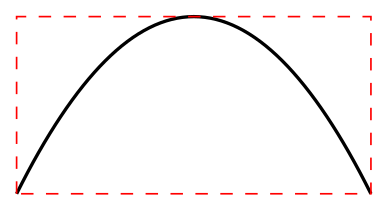
\usepackage{tikz}\begin{tikzpicture}
\useasboundingbox (0,0) rectangle (3,1.5);
\draw[thick] (0,0) .. controls (1,2) and (2,2) .. (3,0);
\draw[red, dashed] (current bounding box.south west)
rectangle (current bounding box.north east);
\end{tikzpicture}Full document
\documentclass[border=4pt]{standalone}
\usepackage{tikz}
\begin{document}
\begin{tikzpicture}
  \useasboundingbox (0,0) rectangle (3,1.5);
  \draw[thick] (0,0) .. controls (1,2) and (2,2) .. (3,0);
  \draw[red, dashed] (current bounding box.south west)
    rectangle (current bounding box.north east);
\end{tikzpicture}
\end{document}Inline TikZ in a line of text, with baseline
Use \tikz to put a small picture in a sentence. By default TikZ puts the lowest point of the picture on the baseline of the text, so a symbol sits on the line like a letter with no descender. The baseline option moves it:
baseline=-0.5exputs the height −0.5ex of the picture on the baseline. For a symbol drawn around (0,0) that lifts its centre to half the height of a lower-case x, which looks centred.baseline=(k.base)puts the baseline of nodek’s text on the text baseline, so text in a framed node lines up with the words around it.baseline=(current bounding box.north)aligns the top of the picture with the baseline, which helps when a picture starts a table cell;baseline=defaultgoes back to the normal placement.

\usepackage{tikz}\begin{minipage}{8cm}
Default: a \tikz \draw (0,0) circle [radius=1ex]; sits on the line.\par
With \texttt{baseline=-0.5ex}: a \tikz[baseline=-0.5ex] \draw (0,0) circle [radius=1ex]; is centred.\par
With \texttt{baseline=(k.base)}: a \tikz[baseline=(k.base)] \node[draw, rounded corners, inner sep=2pt] (k) {key}; lines up.
\end{minipage}Full document
\documentclass[border=4pt]{standalone}
\usepackage{tikz}
\begin{document}
\begin{minipage}{8cm}
Default: a \tikz \draw (0,0) circle [radius=1ex]; sits on the line.\par
With \texttt{baseline=-0.5ex}: a \tikz[baseline=-0.5ex] \draw (0,0) circle [radius=1ex]; is centred.\par
With \texttt{baseline=(k.base)}: a \tikz[baseline=(k.base)] \node[draw, rounded corners, inner sep=2pt] (k) {key}; lines up.
\end{minipage}
\end{document}Common errors and how to fix them
| LaTeX says (or you see) | Cause and fix |
|---|---|
| Environment tikzpicture undefined. | The preamble lacks \usepackage{tikz}. |
| Text typed in the picture does not appear (no error) | Text outside nodes is suppressed in a tikzpicture. Put it in a node: \node at (x,y) {…};. |
| \caption outside float. | \caption works only in a figure or table: wrap the picture and its caption in \begin{figure} … \end{figure}. |
Missing \endgroup inserted. (at \end{figure}) | A \begin{tikzpicture} without its \end{tikzpicture}. |
| Overfull \hbox (…pt too wide) | The picture is wider than the text: shrink the coordinates or use scale, or wrap it in \resizebox{\linewidth}{!}{…} (with \noindent in front when it is not in a figure). |
The text did not get bigger with scale | That is how scale works. Add transform shape, or use \scalebox / \resizebox to scale everything. |
| The picture is not centred, or has empty space on one side | The bounding box includes curve control points or stray coordinates; set it with \useasboundingbox. |
Frequently asked questions
How do I scale a tikzpicture?
Add scale=… to its options, for example \begin{tikzpicture}[scale=0.8]. This scales the coordinates but keeps the text and line widths. Add transform shape to scale the nodes too, or wrap the picture in \resizebox{\linewidth}{!}{…} to scale everything to the text width.
Why doesn’t scale change the font size in TikZ?
scale is a coordinate transformation, and TikZ does not apply transformations to nodes unless you ask for it with transform shape. This keeps the text the same size as the rest of your document.
How do I centre a tikzpicture?
Inside a figure, write \centering after \begin{figure}. In running text, use \begin{center} … \end{center}. If it still looks off-centre, the bounding box is larger than the visible drawing; fix it with \useasboundingbox.
How do I add a caption to a TikZ picture?
Put the tikzpicture in a figure environment and write \caption{…} after it, then \label{…} to refer to it with \ref.
What is the difference between \tikz and \begin{tikzpicture}?
None in what they draw: \tikz is the short form for one command, or for several commands in braces, and is handy inside a line of text. The environment is easier to read for anything longer.
How do I make a tikzpicture fit the text width?
Wrap it in \resizebox{\linewidth}{!}{…}. The text and lines scale with it, so for a figure with labels it is often better to change the coordinates or use scale and keep the font size.
Can I put a tikzpicture in a table or next to text?
Yes: it is a box like a large letter. Use the baseline option to align it vertically, for example baseline=(current bounding box.north) to align its top with the baseline.
References
- PGF/TikZ manual (version 3.1.12), §12 Hierarchical Structures: Package, Environments, Scopes, and Stylestikz.dev
- PGF/TikZ manual (version 3.1.12), §12.2.1 Creating a Picture Using an Environment (bounding box, baseline, every picture)tikz.dev
- PGF/TikZ manual (version 3.1.12), /tikz/baseline (in §12.2.1)tikz.dev
- PGF/TikZ manual (version 3.1.12), §12.2.2 Creating a Picture Using a Command (\tikz)tikz.dev
- PGF/TikZ manual (version 3.1.12), §12.4.2 Using Styles to Manage How Pictures Looktikz.dev
- PGF/TikZ manual (version 3.1.12), §15.8 Establishing a Bounding Box (use as bounding box, current bounding box)tikz.dev
- PGF/TikZ manual (version 3.1.12), §17.2.1 Syntax of the Node Command (every node)tikz.dev
- PGF/TikZ manual (version 3.1.12), §17.7 Transformations (of nodes; transform shape)tikz.dev
- PGF/TikZ manual (version 3.1.12), §25.2 The XY- and XYZ-Coordinate Systems (x=, y=)tikz.dev
- PGF/TikZ manual (version 3.1.12), §25.3 Coordinate Transformations (scale, xscale, yscale)tikz.dev
- Packages in the graphics bundle (grfguide, 2026-05-17), §4.3 Scaling (\scalebox, \resizebox)mirrors.ctan.org
- LaTeX2e unofficial reference manual: figure (placement h, t, b, p; \caption, \label)latexref.xyz
- LaTeX2e unofficial reference manual: \centering (no extra space, unlike center)latexref.xyz
- LaTeX2e unofficial reference manual: centerlatexref.xyz
The facts on this page were checked against these sources, and every picture is the code with it typeset with TeX Live 2026. Code on this page: CC0 1.0, copy it freely.
Try the code in your browserEvery snippet on this page opens in the free TikZ editor: it is typeset with TeX Live as you type, with errors pointed at their line.
Open the TikZ editor