How to make a text box in TikZ
Quick answer
\node[draw, text width=5cm, align=center, inner sep=8pt] {Your text};. text width wraps the text at that width, align sets left, center, right or justify, font=\bfseries\small changes the weight and size, and fill, rounded corners and draw=blue style the box. Without a text width, break lines yourself with \\, which only works when align is set.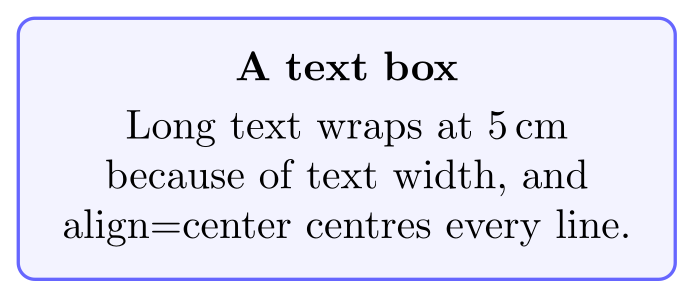
\usepackage{tikz}\begin{tikzpicture}
\node[draw=blue!60, fill=blue!5, thick, rounded corners,
text width=5cm, align=center, inner sep=8pt]
{\textbf{A text box}\\[2pt]
Long text wraps at 5\,cm because of text width,
and align=center centres every line.};
\end{tikzpicture}Full document
\documentclass[border=4pt]{standalone}
\usepackage{tikz}
\begin{document}
\begin{tikzpicture}
  \node[draw=blue!60, fill=blue!5, thick, rounded corners,
        text width=5cm, align=center, inner sep=8pt]
    {\textbf{A text box}\\[2pt]
     Long text wraps at 5\,cm because of text width,
     and align=center centres every line.};
\end{tikzpicture}
\end{document}Contents
A text box is a node with draw
Text in TikZ lives in nodes. \node[draw] at (0,0) {Text}; typesets the text, puts the default rectangle shape around it and strokes that shape because of draw. Everything about the box is an option: draw=blue!60 for the border colour, fill=blue!5 for the background, thick for the line, rounded corners for the corners, and inner sep (initially .3333em) for the padding between text and border.
A node is better than drawing a rectangle and placing text on top: the box always fits the text, the text stays centred, and the node gets a name, \node[draw] (n) {…};, so arrows can end on its border and other text can be placed at its anchors. The quick answer above uses all of these options; the sections below take them one at a time.
Line breaks: \\, text width or a tabular
By default a node puts all its text on one line, however long. There are three ways to get several lines, as the manual lists them:
\\withalign.\node[draw, align=left] {First line\\second line};breaks where you say, and the box is as wide as the longest line.\\[6pt]adds space before the next line. Withoutalignthe\\is silently dropped and the lines run together.text width.text width=3cmturns the text into a paragraph 3 cm wide that TeX breaks automatically. The box is then that wide even if the text is shorter, plus the inner sep on each side. A blank line starts a new paragraph inside it; without a text width a blank line is ignored.- A
tabularinside the node, when you need columns or LaTeX’s own alignment.

\usepackage{tikz}\begin{tikzpicture}[every node/.style={draw, anchor=north west}]
% 1) \\ breaks lines, but only when align is set
\node[align=left] at (0,0) {First line\\second line\\[6pt]after a 6pt gap};
% 2) text width breaks lines automatically
\node[text width=3cm] at (3.4,0) {Automatic line breaks inside a box 3\,cm wide.};
% 3) a tabular gives columns
\node at (7.2,0) {\begin{tabular}{ll} size & 3\,cm\\ colour & blue\end{tabular}};
\end{tikzpicture}Full document
\documentclass[border=4pt]{standalone}
\usepackage{tikz}
\begin{document}
\begin{tikzpicture}[every node/.style={draw, anchor=north west}]
  % 1) \\ breaks lines, but only when align is set
  \node[align=left] at (0,0) {First line\\second line\\[6pt]after a 6pt gap};
  % 2) text width breaks lines automatically
  \node[text width=3cm] at (3.4,0) {Automatic line breaks inside a box 3\,cm wide.};
  % 3) a tabular gives columns
  \node at (7.2,0) {\begin{tabular}{ll} size & 3\,cm\\ colour & blue\end{tabular}};
\end{tikzpicture}
\end{document}Align the text
align takes left, center, right, justify, flush left, flush center, flush right or none. With a text width, align=left (the default once text width is set) gives a ragged right edge, and justify straightens both edges, which only looks good in wide boxes: in the 2.6 cm box below the spaces stretch badly. The flush variants use LaTeX’s ragged margins without TeX’s balancing, which the manual suggests for very narrow boxes. Without a text width, align only lines up the lines you broke with \\.

\usepackage{tikz}\begin{tikzpicture}[every node/.style={draw, text width=2.6cm, anchor=north}]
\node[align=left] at (0,0) {align=left: ragged right, the default.};
\node[align=center] at (3.2,0) {align=center: every line centred.};
\node[align=right] at (6.4,0) {align=right: ragged left edge.};
\node[align=justify] at (9.6,0) {align=justify: both edges straight.};
\end{tikzpicture}Full document
\documentclass[border=4pt]{standalone}
\usepackage{tikz}
\begin{document}
\begin{tikzpicture}[every node/.style={draw, text width=2.6cm, anchor=north}]
  \node[align=left]    at (0,0)   {align=left: ragged right, the default.};
  \node[align=center]  at (3.2,0) {align=center: every line centred.};
  \node[align=right]   at (6.4,0) {align=right: ragged left edge.};
  \node[align=justify] at (9.6,0) {align=justify: both edges straight.};
\end{tikzpicture}
\end{document}Bold text, font size, font family and colour
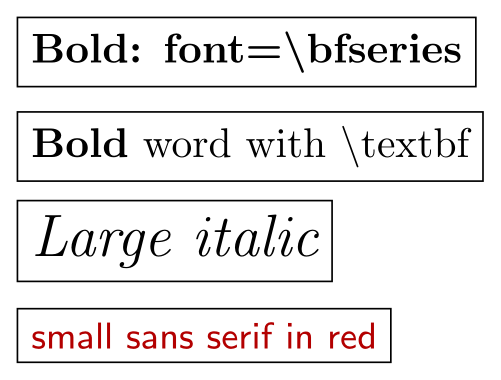
Set the font of a whole node with font= and LaTeX font declarations: font=\bfseries for bold, \itshape for italic, \sffamily or \ttfamily for the family, and a size from \tiny to \Huge. Combine them: font=\sffamily\small\bfseries. For one bold word, use \textbf{word} inside the text. Do not write font=\textbf: \textbf is a command that needs an argument, and LaTeX stops with Extra }, or forgotten \endgroup.
There is also node font=. The difference matters for sizes in em and ex: node font is installed before the node’s size is computed, so minimum height=3em follows it, while font only changes the text. Colour the text with text=red; color=red sets the colour for the text, the border and any fill without its own colour, and text opacity fades the text alone.
\usepackage{tikz}\begin{tikzpicture}[every node/.style={draw, anchor=west}]
\node[font=\bfseries] at (0,2.4) {Bold: font=\textbackslash bfseries};
\node at (0,1.6) {\textbf{Bold} word with \textbackslash textbf};
\node[font=\Large\itshape] at (0,0.8) {Large italic};
\node[font=\sffamily\small, text=red!70!black] at (0,0) {small sans serif in red};
\end{tikzpicture}Full document
\documentclass[border=4pt]{standalone}
\usepackage{tikz}
\begin{document}
\begin{tikzpicture}[every node/.style={draw, anchor=west}]
  \node[font=\bfseries]                     at (0,2.4) {Bold: font=\textbackslash bfseries};
  \node                                     at (0,1.6) {\textbf{Bold} word with \textbackslash textbf};
  \node[font=\Large\itshape]                at (0,0.8) {Large italic};
  \node[font=\sffamily\small, text=red!70!black] at (0,0) {small sans serif in red};
\end{tikzpicture}
\end{document}Boxes of the same size
Nodes size themselves to their text, so a row of labels gives boxes of different widths. Give them a common minimum width and minimum height (with units), best in a style defined once: box/.style={draw, align=center, minimum width=2.6cm, minimum height=1.2cm}. Every node with [box] is then at least that big; a two-line label fits as long as it is not taller than the minimum. For text that should line up on a common baseline in boxes of different content, text height and text depth fix the height of the text itself.

\usepackage{tikz}\begin{tikzpicture}[box/.style={draw, fill=green!10, align=center,
minimum width=2.6cm, minimum height=1.2cm}]
\node[box] (a) at (0,0) {Sample};
\node[box] (b) at (3.4,0) {DNA\\extraction};
\node[box] (c) at (6.8,0) {Sequencing};
\draw[->] (a) -- (b);
\draw[->] (b) -- (c);
\end{tikzpicture}Full document
\documentclass[border=4pt]{standalone}
\usepackage{tikz}
\begin{document}
\begin{tikzpicture}[box/.style={draw, fill=green!10, align=center,
                                minimum width=2.6cm, minimum height=1.2cm}]
  \node[box] (a) at (0,0)   {Sample};
  \node[box] (b) at (3.4,0) {DNA\\extraction};
  \node[box] (c) at (6.8,0) {Sequencing};
  \draw[->] (a) -- (b);
  \draw[->] (b) -- (c);
\end{tikzpicture}
\end{document}A text box with a title
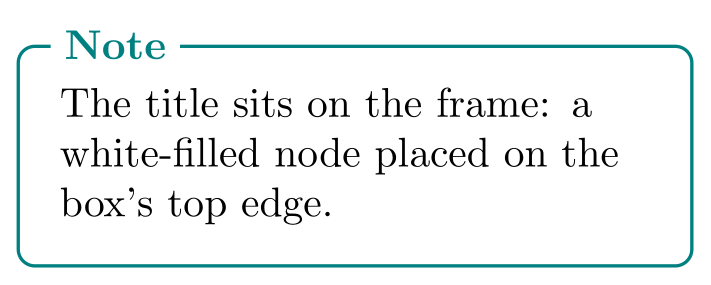
TikZ has no title option for boxes; you place a second node on the first one using its anchors. For a title on the frame, put a white-filled node on the top edge: at ([xshift=8pt]box.north west) with anchor=west starts it 8pt in from the corner, and its white fill hides the line behind the text. For a title bar, stack a filled node on top with anchor=south west at body.north west; with the same text width and inner sep both nodes are exactly as wide.
For boxes in the running text of a document, with titles, colours and page breaks, the tcolorbox package (built on TikZ) does this for you.
\usepackage{tikz}\begin{tikzpicture}
\node[draw=teal, thick, rounded corners, text width=5cm, inner sep=10pt] (box)
{The title sits on the frame: a white-filled node placed on the box's top edge.};
\node[fill=white, text=teal, font=\bfseries, anchor=west]
at ([xshift=8pt]box.north west) {Note};
\end{tikzpicture}Full document
\documentclass[border=4pt]{standalone}
\usepackage{tikz}
\begin{document}
\begin{tikzpicture}
  \node[draw=teal, thick, rounded corners, text width=5cm, inner sep=10pt] (box)
    {The title sits on the frame: a white-filled node placed on the box's top edge.};
  \node[fill=white, text=teal, font=\bfseries, anchor=west]
    at ([xshift=8pt]box.north west) {Note};
\end{tikzpicture}
\end{document}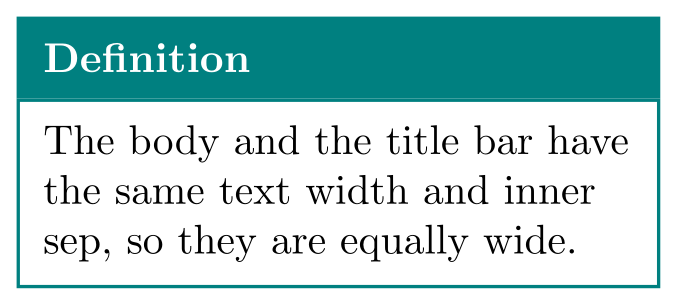
\usepackage{tikz}\begin{tikzpicture}[every node/.style={text width=5cm, inner sep=6pt, draw=teal, thick}]
\node (body)
{The body and the title bar have the same text width and inner sep, so they are equally wide.};
\node[fill=teal, text=white, font=\bfseries, anchor=south west]
at (body.north west) {Definition};
\end{tikzpicture}Full document
\documentclass[border=4pt]{standalone}
\usepackage{tikz}
\begin{document}
\begin{tikzpicture}[every node/.style={text width=5cm, inner sep=6pt, draw=teal, thick}]
  \node (body)
    {The body and the title bar have the same text width and inner sep, so they are equally wide.};
  \node[fill=teal, text=white, font=\bfseries, anchor=south west]
    at (body.north west) {Definition};
\end{tikzpicture}
\end{document}Callouts and speech bubbles
The shapes.callouts library adds rectangle callout, ellipse callout and cloud callout: a box with a pointer that is part of the shape. callout absolute pointer={(0,0)} points at a coordinate (or a node anchor), while callout relative pointer={(-0.5,-0.4)} (initially (315:.5cm)) is a vector from the box’s border, so it always ends outside the box whatever its size. callout pointer width (rectangle callout, initially .25cm) and callout pointer arc (ellipse callout, initially 15) set the pointer’s base, and callout pointer shorten pulls the tip back. The pointer is ignored when the node’s size and anchors are computed.
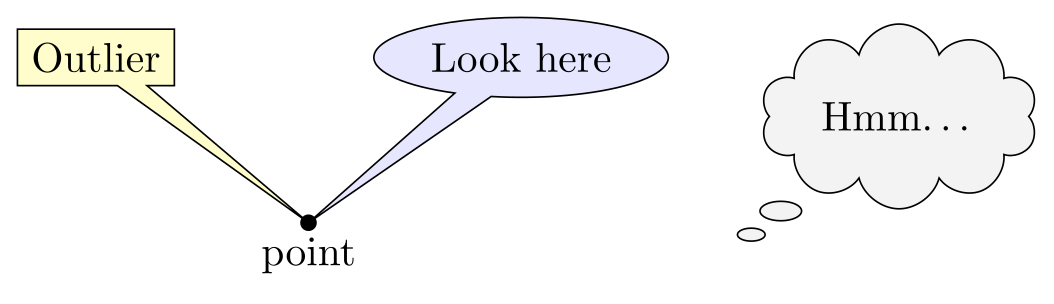
\usepackage{tikz} \usetikzlibrary{shapes.callouts}\begin{tikzpicture}
\fill (0,0) circle[radius=2pt] node[below] {point};
\node[rectangle callout, draw, fill=yellow!20,
callout absolute pointer={(0,0)}] at (-1.8,1.4) {Outlier};
\node[ellipse callout, draw, fill=blue!10,
callout absolute pointer={(0,0)}] at (1.8,1.4) {Look here};
\node[cloud callout, draw, fill=gray!10, aspect=2,
callout relative pointer={(-0.5,-0.4)}] at (5,0.9) {Hmm\dots};
\end{tikzpicture}Full document
\documentclass[border=4pt]{standalone}
\usepackage{tikz}
\usetikzlibrary{shapes.callouts}
\begin{document}
\begin{tikzpicture}
  \fill (0,0) circle[radius=2pt] node[below] {point};
  \node[rectangle callout, draw, fill=yellow!20,
        callout absolute pointer={(0,0)}] at (-1.8,1.4) {Outlier};
  \node[ellipse callout, draw, fill=blue!10,
        callout absolute pointer={(0,0)}] at (1.8,1.4) {Look here};
  \node[cloud callout, draw, fill=gray!10, aspect=2,
        callout relative pointer={(-0.5,-0.4)}] at (5,0.9) {Hmm\dots};
\end{tikzpicture}
\end{document}A box behind text that is already drawn
TikZ draws in the order you write, so a filled box written after some text covers it. The backgrounds library fixes the order: material inside \begin{scope}[on background layer] is placed behind the rest of the picture. Together with fit from the fit library, which sizes a node to enclose other nodes, this puts a highlight box behind text you have already placed. To frame a whole picture instead, give the tikzpicture show background rectangle (or its shorthand framed) and style it with background rectangle/.style={fill=yellow!10, rounded corners}; inner frame sep sets its margin (inner frame xsep and inner frame ysep are initially 1ex).
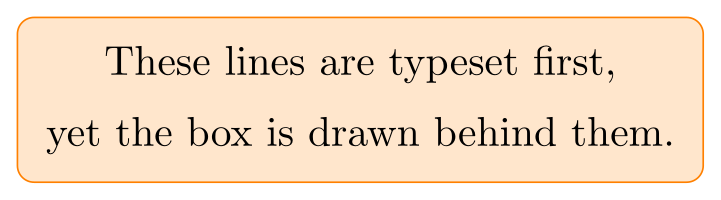
\usepackage{tikz} \usetikzlibrary{backgrounds, fit}\begin{tikzpicture}
\node (t1) at (0,0) {These lines are typeset first,};
\node (t2) at (0,-0.6) {yet the box is drawn behind them.};
\begin{scope}[on background layer]
\node[fill=orange!20, draw=orange, rounded corners, fit=(t1) (t2)] {};
\end{scope}
\end{tikzpicture}Full document
\documentclass[border=4pt]{standalone}
\usepackage{tikz}
\usetikzlibrary{backgrounds, fit}
\begin{document}
\begin{tikzpicture}
  \node (t1) at (0,0)    {These lines are typeset first,};
  \node (t2) at (0,-0.6) {yet the box is drawn behind them.};
  \begin{scope}[on background layer]
    \node[fill=orange!20, draw=orange, rounded corners, fit=(t1) (t2)] {};
  \end{scope}
\end{tikzpicture}
\end{document}Place text with anchors and labels
A node is centred on its coordinate unless you name an anchor: anchor=north west puts the node’s top-left corner on the coordinate, so \node[anchor=north west] at (b.north west) {…}; sits inside the top-left corner of box b. above, below, left, right and combinations like above right are the same thing named by where the text ends up (above is anchor=south). The red dots below mark the coordinates.
For text attached to a node, label=above:{text} (or below, left, an angle such as 30) creates and places a second node for you. With the positioning library, right=1cm of b places a node 1 cm from the border of another.
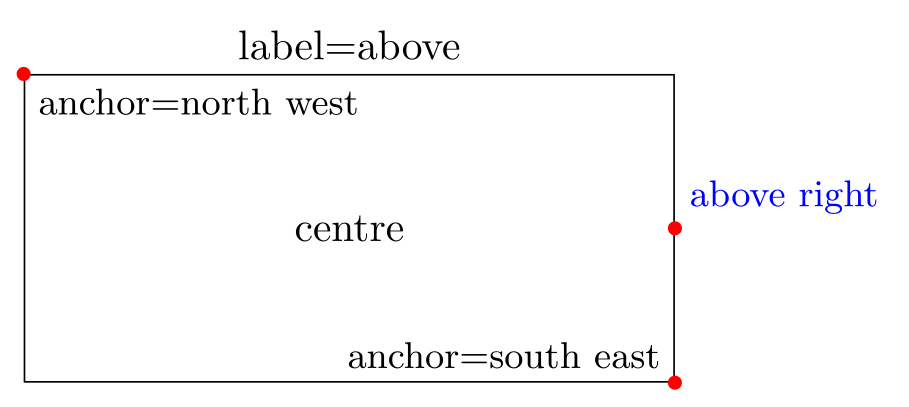
\usepackage{tikz}\begin{tikzpicture}[dot/.style={fill=red, circle, inner sep=1.2pt}]
\node[draw, minimum width=5.5cm, minimum height=2.6cm, label=above:{label=above}] (b) {centre};
\node[anchor=north west, font=\small] at (b.north west) {anchor=north west};
\node[anchor=south east, font=\small] at (b.south east) {anchor=south east};
\node[above right, font=\small, text=blue] at (b.east) {above right};
\node[dot] at (b.north west) {};
\node[dot] at (b.south east) {};
\node[dot] at (b.east) {};
\end{tikzpicture}Full document
\documentclass[border=4pt]{standalone}
\usepackage{tikz}
\begin{document}
\begin{tikzpicture}[dot/.style={fill=red, circle, inner sep=1.2pt}]
  \node[draw, minimum width=5.5cm, minimum height=2.6cm, label=above:{label=above}] (b) {centre};
  \node[anchor=north west, font=\small] at (b.north west) {anchor=north west};
  \node[anchor=south east, font=\small] at (b.south east) {anchor=south east};
  \node[above right, font=\small, text=blue] at (b.east) {above right};
  \node[dot] at (b.north west) {};
  \node[dot] at (b.south east) {};
  \node[dot] at (b.east) {};
\end{tikzpicture}
\end{document}A box around a word in a paragraph
\tikz is the inline form of a tikzpicture, so a boxed word can sit in running text. Add baseline=(k.base) to put the node’s text baseline on the line’s baseline; otherwise the bottom of the picture sits on the baseline and the box rides high. In the example the minipage only stands in for your paragraph.

\usepackage{tikz}\begin{minipage}{7.5cm}\raggedright
Press \tikz[baseline=(k.base)] \node[draw, rounded corners=2pt, inner sep=2pt,
fill=gray!15] (k) {Enter}; to confirm or \tikz[baseline=(e.base)] \node[draw,
rounded corners=2pt, inner sep=2pt, fill=gray!15] (e) {Esc}; to cancel; the
boxes sit on the same baseline as the words around them.
\end{minipage}Full document
\documentclass[border=4pt]{standalone}
\usepackage{tikz}
\begin{document}
\begin{minipage}{7.5cm}\raggedright
  Press \tikz[baseline=(k.base)] \node[draw, rounded corners=2pt, inner sep=2pt,
  fill=gray!15] (k) {Enter}; to confirm or \tikz[baseline=(e.base)] \node[draw,
  rounded corners=2pt, inner sep=2pt, fill=gray!15] (e) {Esc}; to cancel; the
  boxes sit on the same baseline as the words around them.
\end{minipage}
\end{document}Common errors and how to fix them
| LaTeX says (or you see) | Cause and fix |
|---|---|
| Lines broken with \\ run together in one line (no error) | Inside a node, \\ only breaks the line when align or text width is set. Add align=left, center or right. |
| Extra }, or forgotten \endgroup. | Usually font=\textbf. The font key takes declarations, not commands with an argument: write font=\bfseries (or \itshape, \large…), or put \textbf{…} inside the node text. |
| Missing $ inserted. | An underscore or caret in the node text, as in data_file.csv. Write data\_file.csv, or put mathematics between $…$. |
| Package pgfkeys Error: I do not know the key '/tikz/rectangle callout' and I am going to ignore it. Perhaps you misspelled it. | Add \usetikzlibrary{shapes.callouts}; it covers rectangle, ellipse and cloud callouts. |
| Package pgfkeys Error: I do not know the key '/tikz/on background layer' and I am going to ignore it. Perhaps you misspelled it. | Add \usetikzlibrary{backgrounds}. The key only works on a scope (or \scoped), not on a single \node. |
| A blank line in the node text has no effect (no error) | Without text width the node is one line and paragraph breaks are ignored. Set text width to get real paragraphs, or break lines with \\ and align. |
Frequently asked questions
How do I wrap text inside a TikZ node?
Give the node a text width: \node[draw, text width=4cm] {long text…}; breaks the text into lines 4 cm wide, ragged right. Add align=center or align=justify to change the alignment. The box is 4 cm plus twice the inner sep wide.
How do I make text bold in TikZ?
For a whole node, use font=\bfseries: \node[font=\bfseries] {Bold};. For part of the text, use \textbf{…} inside the braces. font=\textbf does not work, because the font key expects declarations such as \bfseries, \itshape or \small.
How do I change the font size of text in a TikZ node?
Add a LaTeX size to the font key, such as font=\small, font=\Large or font=\footnotesize\sffamily. To change every node in a picture, put it on the picture: \begin{tikzpicture}[every node/.style={font=\small}]. Use node font instead of font if sizes given in em, like minimum height=3em, should follow the font.
How do I add a title to a box in TikZ?
Place a second node on the box with anchors. For a title on the frame: \node[fill=white, anchor=west] at ([xshift=8pt]box.north west) {Title};. For a title bar: a filled node with anchor=south west at box.north west and the same text width. For titled boxes in running text that may break across pages, the tcolorbox package is the better tool.
How do I draw a box around a word in a LaTeX paragraph?
Use an inline \tikz with a baseline: \tikz[baseline=(X.base)] \node[draw, inner sep=2pt] (X) {word}; keeps the boxed word on the line. Plain LaTeX \fbox{word} also works for a simple square box.
How do I put a coloured box behind text I have already drawn?
Load the backgrounds and fit libraries, name the text nodes, and add the box afterwards on the background layer: \begin{scope}[on background layer] \node[fill=yellow!20, fit=(a) (b)] {}; \end{scope}.
References
- PGF/TikZ manual, §17.4.1 Text Parameters: Color and Opacitytikz.dev
- PGF/TikZ manual, §17.4.2 Text Parameters: Fonttikz.dev
- PGF/TikZ manual, §17.4.3 Text Parameters: Alignment and Width for Multi-Line Texttikz.dev
- PGF/TikZ manual, §17.2.3 Common Options: Separations, Margins, Padding and Border Rotationtikz.dev
- PGF/TikZ manual, §17.5.1 Positioning Nodes Using Anchorstikz.dev
- PGF/TikZ manual, §17.10.2 The Label Optiontikz.dev
- PGF/TikZ manual, §71.7 Callout Shapestikz.dev
- PGF/TikZ manual, §45 Background Librarytikz.dev
- PGF/TikZ manual, §54 Fitting Librarytikz.dev
- PGF/TikZ manual, §12.2.1 Creating a Picture Using an Environment (baseline)tikz.dev
- tcolorbox package on CTANctan.org
The facts on this page were checked against these sources, and every picture is the code with it typeset with TeX Live 2026. Code on this page: CC0 1.0, copy it freely.
Try the code in your browserEvery snippet on this page opens in the free TikZ editor: it is typeset with TeX Live as you type, with errors pointed at their line.
Open the TikZ editor