Shadows in TikZ (and what overlay means)
Quick answer
\usetikzlibrary{shadows} and add drop shadow to a filled node or closed path: TikZ paints a half-transparent gray copy of the path behind it, shifted .5ex right and .5ex down. Change it with drop shadow={shadow xshift=…, shadow yshift=…, opacity=…, fill=…}. For a soft, blurred shadow load \usetikzlibrary{shadows.blur} (from the pgf-blur package, included in TeX Live and MiKTeX) and write blur shadow. The separate overlay option makes a path take no space in the picture, which together with remember picture lets you draw across text and pages.
\usepackage{tikz} \usetikzlibrary{shadows}\begin{tikzpicture}
% a node: fill it, or the shadow shows through
\node[draw, fill=white, drop shadow] at (0,0) {Node with a shadow};
% a closed path
\filldraw[fill=orange!30, drop shadow] (2.4,-0.4) rectangle (4,0.4);
\end{tikzpicture}Full document
\documentclass[border=4pt]{standalone}
\usepackage{tikz}
\usetikzlibrary{shadows}
\begin{document}
\begin{tikzpicture}
  % a node: fill it, or the shadow shows through
  \node[draw, fill=white, drop shadow] at (0,0) {Node with a shadow};
  % a closed path
  \filldraw[fill=orange!30, drop shadow] (2.4,-0.4) rectangle (4,0.4);
\end{tikzpicture}
\end{document}Contents
How drop shadow works
A shadow in TikZ is the path itself, used once more before it is painted: the shadows library adds a preaction that fills the path in gray, shifted (and optionally scaled) with a canvas transformation, and then the path is drawn normally on top. Two consequences follow. The shadow shows through anything that is not filled, so give the node or path a fill (white on a white page). And the shadow has exactly the shape of the path: a node casts the shadow of its border shape, not of its text.
drop shadow sets these options, then your every shadow style, then whatever you write in its braces, so your values always win:
| Option | drop shadow default | What it does |
|---|---|---|
shadow xshift | .5ex | Moves the shadow right (negative: left). |
shadow yshift | -.5ex | Moves the shadow up (negative: down). |
shadow scale | 1 | Scales the shadow around the centre of the path. |
opacity | .5 | Ordinary TikZ opacity of the shadow; 1 makes it solid. |
fill | black!50 | Colour of the shadow. |
There is no separate shadow opacity or shadow color key in the shadows library: opacity and colour are the normal opacity and fill options, given inside drop shadow={…}. (shadow opacity exists only for blur shadow, below.) All shadows of the shadows library are built on one key, general shadow={…}, which applies the shift and scale but sets no colour; you rarely need it directly.

\usepackage{tikz} \usetikzlibrary{shadows}\begin{tikzpicture}[box/.style={draw, fill=white, minimum width=2.2cm, minimum height=1cm}]
\node[box, drop shadow] at (0,0) {default};
\node[box, drop shadow={shadow xshift=3pt, shadow yshift=-3pt}] at (2.8,0) {xshift, yshift};
\node[box, drop shadow={opacity=.25}] at (5.6,0) {opacity=.25};
\node[box, drop shadow={opacity=1, fill=black!30}] at (8.4,0) {opaque gray};
\end{tikzpicture}Full document
\documentclass[border=4pt]{standalone}
\usepackage{tikz}
\usetikzlibrary{shadows}
\begin{document}
\begin{tikzpicture}[box/.style={draw, fill=white, minimum width=2.2cm, minimum height=1cm}]
  \node[box, drop shadow] at (0,0) {default};
  \node[box, drop shadow={shadow xshift=3pt, shadow yshift=-3pt}] at (2.8,0) {xshift, yshift};
  \node[box, drop shadow={opacity=.25}] at (5.6,0) {opacity=.25};
  \node[box, drop shadow={opacity=1, fill=black!30}] at (8.4,0) {opaque gray};
\end{tikzpicture}
\end{document}Coloured shadows and every shadow
For a coloured shadow pass a fill colour, usually a dark shade of the node’s own colour, which looks more natural than gray on coloured shapes. To restyle every shadow in a picture or document at once, set every shadow/.style={…} on the picture or with \tikzset in the preamble; options written in a particular drop shadow={…} still override it.

\usepackage{tikz} \usetikzlibrary{shadows}\begin{tikzpicture}[every shadow/.style={fill=blue!60!black, opacity=.35}]
% every shadow restyles all shadows in this picture
\node[draw=blue!60!black, fill=blue!10, drop shadow] at (0,0) {every shadow};
% options given to the shadow itself win over every shadow
\node[draw=red!70!black, fill=red!10, drop shadow={fill=red!70!black, opacity=.6}]
at (3.2,0) {per node};
\end{tikzpicture}Full document
\documentclass[border=4pt]{standalone}
\usepackage{tikz}
\usetikzlibrary{shadows}
\begin{document}
\begin{tikzpicture}[every shadow/.style={fill=blue!60!black, opacity=.35}]
  % every shadow restyles all shadows in this picture
  \node[draw=blue!60!black, fill=blue!10, drop shadow] at (0,0) {every shadow};
  % options given to the shadow itself win over every shadow
  \node[draw=red!70!black, fill=red!10, drop shadow={fill=red!70!black, opacity=.6}]
    at (3.2,0) {per node};
\end{tikzpicture}
\end{document}Copy shadows: a stack of pages
copy shadow is not really a shadow: it draws a second copy of the path, with the same fill and draw colours, slightly offset behind it, so a node looks like the top sheet of a small stack. double copy shadow adds a second copy at twice the offset. Both are shifted by .5ex to the right and .5ex up per copy: the manual’s text lists shadow yshift=-.5ex, but the library code (pgf 3.1.12) uses +.5ex, which is what you get, as the picture shows. Pass shadow xshift/shadow yshift in the braces to move the copies elsewhere.
Shadings are not copied: for a node with left color=…, repeat the shading inside the shadow, e.g. copy shadow={left color=blue!50}.
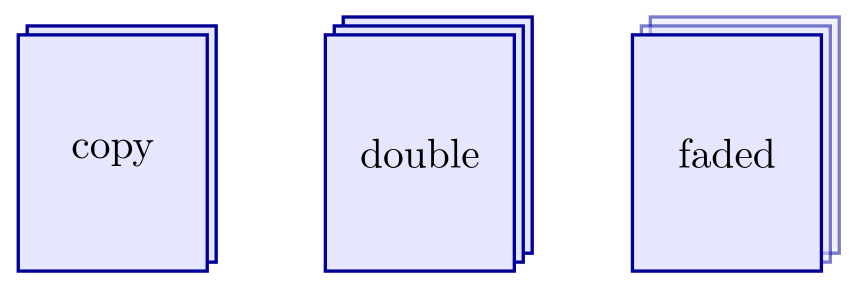
\usepackage{tikz} \usetikzlibrary{shadows}\begin{tikzpicture}[page/.style={draw=blue!60!black, fill=blue!10, thick,
minimum width=1.6cm, minimum height=2cm}]
\node[page, copy shadow] at (0,0) {copy};
\node[page, double copy shadow] at (2.6,0) {double};
\node[page, double copy shadow={opacity=.5}] at (5.2,0) {faded};
% the copies sit up and to the right, outside the bounding box: leave room
\path (current bounding box.north east) ++(4pt,4pt);
\end{tikzpicture}Full document
\documentclass[border=4pt]{standalone}
\usepackage{tikz}
\usetikzlibrary{shadows}
\begin{document}
\begin{tikzpicture}[page/.style={draw=blue!60!black, fill=blue!10, thick,
                                 minimum width=1.6cm, minimum height=2cm}]
  \node[page, copy shadow] at (0,0) {copy};
  \node[page, double copy shadow] at (2.6,0) {double};
  \node[page, double copy shadow={opacity=.5}] at (5.2,0) {faded};
  % the copies sit up and to the right, outside the bounding box: leave room
  \path (current bounding box.north east) ++(4pt,4pt);
\end{tikzpicture}
\end{document}Circular drop shadow and circular glow
Two shadows are made for circles (and ellipses) only. circular drop shadow scales the path by 1.1, shifts it .3ex right and down and fades its edge with the fading circle with fuzzy edge 15 percent, so the shadow blends into the page. circular glow uses the same fading, scaled by 1.25 and not shifted, which gives a halo; circular glow={fill=orange} colours it. Because the fading is circular, both look wrong on rectangles; use blur shadow for soft shadows on other shapes.
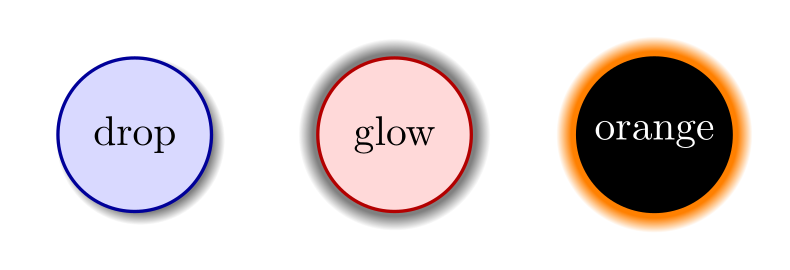
\usepackage{tikz} \usetikzlibrary{shadows}\begin{tikzpicture}[ball/.style={circle, thick, minimum size=1.3cm}]
\node[ball, draw=blue!60!black, fill=blue!15, circular drop shadow] at (0,0) {drop};
\node[ball, draw=red!70!black, fill=red!15, circular glow] at (2.2,0) {glow};
\node[ball, fill=black, text=white, circular glow={fill=orange}] at (4.4,0) {orange};
% the glow is 25% larger than the circle: leave room for it
\path (-1,-1) rectangle (5.4,1);
\end{tikzpicture}Full document
\documentclass[border=4pt]{standalone}
\usepackage{tikz}
\usetikzlibrary{shadows}
\begin{document}
\begin{tikzpicture}[ball/.style={circle, thick, minimum size=1.3cm}]
  \node[ball, draw=blue!60!black, fill=blue!15, circular drop shadow] at (0,0) {drop};
  \node[ball, draw=red!70!black, fill=red!15, circular glow] at (2.2,0) {glow};
  \node[ball, fill=black, text=white, circular glow={fill=orange}] at (4.4,0) {orange};
  % the glow is 25% larger than the circle: leave room for it
  \path (-1,-1) rectangle (5.4,1);
\end{tikzpicture}
\end{document}Soft shadows: the shadows.blur library (pgf-blur)
The blurred shadow is not part of PGF itself but of the separate pgf-blur package (version 1.02), which is included in TeX Live and MiKTeX and installs a TikZ library. Load it with \usetikzlibrary{shadows.blur} (it loads shadows for you; there is no pgf-blur.sty to \usepackage) and add blur shadow to a filled, closed path or node. Its options, with their defaults from the package:
| Option | Default | What it does |
|---|---|---|
shadow xshift, shadow yshift | .5ex, -.5ex | Offset of the shadow. |
shadow scale | 1 | Size of the shadow relative to the path. |
shadow blur radius | .4ex | How far the edge is blurred, inwards and outwards. |
shadow opacity | 40 | Opacity of the darkest part, as a percentage from 0 to 100. |
shadow blur steps | 4 | Number of opacity steps in the blur; more is smoother but slower. |
shadow blur extra rounding | off (when given: the blur radius) | Rounds the corners of the shadow before blurring. |
Two things differ from the shadows library. Blurred shadows are always black (“a shadow is the absence of light”, says the package); only their opacity changes. And blur shadow={…} is a plain style: anything in the braces that is not one of the keys above is applied to the node itself, so blur shadow={fill=red} turns the node red. The same goes for every shadow, so a picture-wide every shadow/.style={opacity=.3} meant for drop shadows also makes blur-shadowed nodes transparent. For a coloured soft-looking shadow, use drop shadow with a colour and a small offset instead.
Nodes made of several parts (for example rectangle split) show their inner lines as light bars in a blurred shadow; the package documentation suggests a very small shadow xshift, or wrapping the node in a plain rectangle node with inner sep=0pt that carries the shadow.
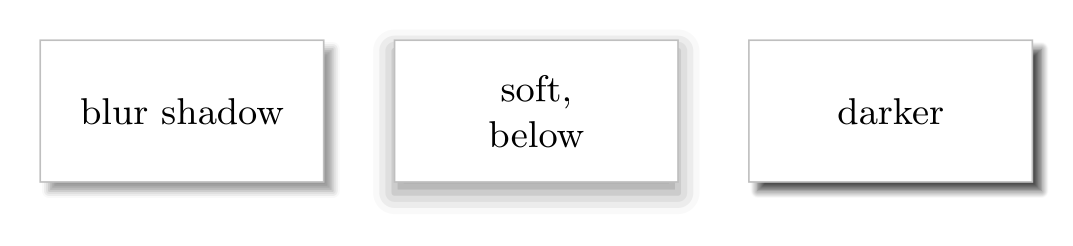
\usepackage{tikz} \usetikzlibrary{shadows.blur}\begin{tikzpicture}[card/.style={draw=black!25, fill=white, minimum width=2.4cm,
minimum height=1.2cm, align=center, font=\small}]
\node[card, blur shadow] at (0,0) {blur shadow};
\node[card, blur shadow={shadow blur radius=1.2ex, shadow xshift=0pt,
shadow yshift=-.6ex}] at (3,0) {soft,\\below};
\node[card, blur shadow={shadow opacity=70, shadow blur steps=8}] at (6,0) {darker};
% blurred shadows are not part of the bounding box either
\path (-1.4,-1) rectangle (7.4,0.8);
\end{tikzpicture}Full document
\documentclass[border=4pt]{standalone}
\usepackage{tikz}
\usetikzlibrary{shadows.blur}
\begin{document}
\begin{tikzpicture}[card/.style={draw=black!25, fill=white, minimum width=2.4cm,
                                 minimum height=1.2cm, align=center, font=\small}]
  \node[card, blur shadow] at (0,0) {blur shadow};
  \node[card, blur shadow={shadow blur radius=1.2ex, shadow xshift=0pt,
                           shadow yshift=-.6ex}] at (3,0) {soft,\\below};
  \node[card, blur shadow={shadow opacity=70, shadow blur steps=8}] at (6,0) {darker};
  % blurred shadows are not part of the bounding box either
  \path (-1.4,-1) rectangle (7.4,0.8);
\end{tikzpicture}
\end{document}Shadows with rounded corners
Because a shadow reuses the path, it has whatever corners the path has: put rounded corners on the node (or on the path, before its coordinates) and the drop or blur shadow is rounded too; nothing extra is needed. With blur shadow on a shape with sharp corners you can also round only the shadow with blur shadow={shadow blur extra rounding}, which softens the slightly pointed look of blurred corners. The package warns that it can distort paths whose segments are shorter than the rounding, and that rounding many complex paths slows TeX down.

\usepackage{tikz} \usetikzlibrary{shadows,shadows.blur}\begin{tikzpicture}[box/.style={draw, fill=white, minimum width=2.4cm, minimum height=1.2cm}]
% the shadow reuses the node's own path, so it gets the same corners
\node[box, rounded corners=8pt, drop shadow] at (0,0) {drop shadow};
\node[box, rounded corners=8pt, blur shadow] at (3,0) {blur shadow};
% same on a path: rounded corners must come before the coordinates
\filldraw[fill=green!15, rounded corners=8pt, drop shadow]
(4.8,-0.6) rectangle (7.2,0.6);
\end{tikzpicture}Full document
\documentclass[border=4pt]{standalone}
\usepackage{tikz}
\usetikzlibrary{shadows,shadows.blur}
\begin{document}
\begin{tikzpicture}[box/.style={draw, fill=white, minimum width=2.4cm, minimum height=1.2cm}]
  % the shadow reuses the node's own path, so it gets the same corners
  \node[box, rounded corners=8pt, drop shadow] at (0,0) {drop shadow};
  \node[box, rounded corners=8pt, blur shadow] at (3,0) {blur shadow};
  % same on a path: rounded corners must come before the coordinates
  \filldraw[fill=green!15, rounded corners=8pt, drop shadow]
    (4.8,-0.6) rectangle (7.2,0.6);
\end{tikzpicture}
\end{document}Shadows on nodes, paths and lines
Any closed path or node shape can cast a shadow: stars and other shapes from shapes.geometric, curves closed with -- cycle, rectangles, circles. Two cases need care:
- Open paths (lines, curves). The shadow is filled, so TikZ closes the curve and you get a gray area, not a line. For the shadow of the stroke, switch the fill off and draw instead:
drop shadow={fill=none, draw=black!50, very thick}. Give the shadow its line width yourself; it does not inherit the one of the path. - Scopes and whole pictures.
\begin{scope}[drop shadow]silently does nothing: the manual is explicit that shadows attach to paths and nodes, not scopes. Put the option on each node (a style such asbox/.style={draw, fill=white, drop shadow}keeps that short), or draw one shadowed rectangle behind the group, for instance a node made with thefitlibrary on the background layer.
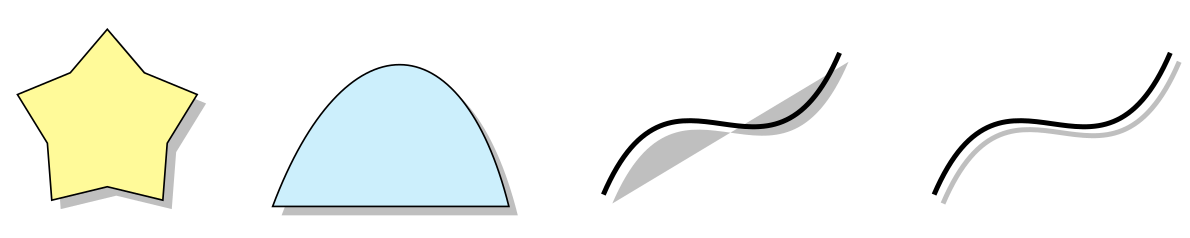
\usepackage{tikz} \usetikzlibrary{shadows,shapes.geometric}\begin{tikzpicture}
% any closed path or node shape can cast a shadow
\node[star, star points=5, draw, fill=yellow!40, minimum size=1.6cm, drop shadow] at (0,0) {};
\filldraw[fill=cyan!20, drop shadow] (1.4,-0.7) .. controls (2,0.9) and (3,0.9) .. (3.4,-0.7) -- cycle;
% an open line: the shadow is FILLED, which is rarely what you want
\draw[very thick, drop shadow] (4.2,-0.6) .. controls (4.8,0.8) and (5.6,-0.8) .. (6.2,0.6);
% shadow of the stroke only: no fill, draw it (the shadow does not inherit the line width)
\draw[very thick, drop shadow={fill=none, draw=black!50, very thick}]
(7,-0.6) .. controls (7.6,0.8) and (8.4,-0.8) .. (9,0.6);
\end{tikzpicture}Full document
\documentclass[border=4pt]{standalone}
\usepackage{tikz}
\usetikzlibrary{shadows,shapes.geometric}
\begin{document}
\begin{tikzpicture}
  % any closed path or node shape can cast a shadow
  \node[star, star points=5, draw, fill=yellow!40, minimum size=1.6cm, drop shadow] at (0,0) {};
  \filldraw[fill=cyan!20, drop shadow] (1.4,-0.7) .. controls (2,0.9) and (3,0.9) .. (3.4,-0.7) -- cycle;
  % an open line: the shadow is FILLED, which is rarely what you want
  \draw[very thick, drop shadow] (4.2,-0.6) .. controls (4.8,0.8) and (5.6,-0.8) .. (6.2,0.6);
  % shadow of the stroke only: no fill, draw it (the shadow does not inherit the line width)
  \draw[very thick, drop shadow={fill=none, draw=black!50, very thick}]
    (7,-0.6) .. controls (7.6,0.8) and (8.4,-0.8) .. (9,0.6);
\end{tikzpicture}
\end{document}Shadow cut off? Shadows are outside the bounding box
The shift of a shadow is a canvas transformation, and TikZ does not count canvas transformations when it computes the size of the picture. So a shadow sticks out of the picture’s bounding box: in a running text it overlaps whatever comes next, and wherever the picture is cropped to its bounding box (the standalone class, externalized figures, an \fbox) the part beyond it is cut off. The default .5ex offset usually fits in the margin around a picture; bigger offsets, double copies and glows do not.
Fix it by adding the shadow’s far corner to the picture with an invisible path, as below (or \path (current bounding box.south east) ++(4pt,-4pt); as the last line), by setting the size with \useasboundingbox, or, in standalone, with a larger border.
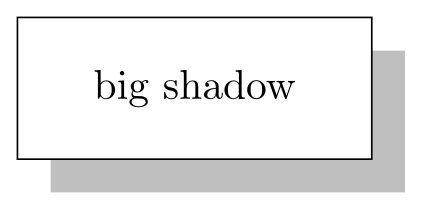
\usepackage{tikz} \usetikzlibrary{shadows}\begin{tikzpicture}
\node[draw, fill=white, minimum width=3cm, minimum height=1.2cm,
drop shadow={shadow xshift=8pt, shadow yshift=-8pt}] (box) {big shadow};
% the shadow is drawn with a canvas shift, so TikZ does not count it in the
% picture size; add its corner to the bounding box yourself
\path ([shift={(8pt,-8pt)}]box.south east);
\end{tikzpicture}Full document
\documentclass[border=4pt]{standalone}
\usepackage{tikz}
\usetikzlibrary{shadows}
\begin{document}
\begin{tikzpicture}
  \node[draw, fill=white, minimum width=3cm, minimum height=1.2cm,
        drop shadow={shadow xshift=8pt, shadow yshift=-8pt}] (box) {big shadow};
  % the shadow is drawn with a canvas shift, so TikZ does not count it in the
  % picture size; add its corner to the bounding box yourself
  \path ([shift={(8pt,-8pt)}]box.south east);
\end{tikzpicture}
\end{document}Performance and printing
- drop shadow, copy shadow: one extra filled path each; cheap even for hundreds of nodes. They use transparency (
opacity=.5), which every PDF viewer shows. If a printer, a PDF/X workflow or the oldlatex→dvipsroute (where transparency needs Ghostscript with-dALLOWPSTRANSPARENCY) gives trouble, use a solid shadow:drop shadow={opacity=1, fill=black!25}. - circular drop shadow, circular glow, blur shadow: made with fadings (soft masks). They look best on screen but render more slowly in viewers, make the PDF larger, and the manual warns that few printers support fadings. pgf-blur declares a new fading for every shadow, so a picture with many blurred shadows compiles and displays more slowly; raising
shadow blur stepsadds to that with little visible gain. - Engines: all of them work with pdfLaTeX, LuaLaTeX and XeLaTeX.
What overlay means in TikZ
overlay is an option of a path, scope or whole picture: everything inside it is still drawn, but not taken into account when TikZ computes the bounding box of the picture (it is a boolean; overlay alone means overlay=true). The picture then takes only the space of its other parts, so overlaid elements can stick out over the surrounding text without pushing it aside, as the red arrow does below. Its counterpart is use as bounding box, which makes one path set the size and ignores everything drawn after it.
Other things called “overlay” around TikZ: to draw over an image, put \includegraphics in a node and draw after it (later paths are painted on top). In Beamer, slide overlays work inside pictures: TikZ paths accept overlay specifications such as \draw<2-> …; or \node<3> …;.

\usepackage{tikz}Text before
\begin{tikzpicture}[baseline=(box.base)]
\node[draw, fill=yellow!40] (box) {box};
% overlay: drawn, but not counted in the picture's size
\draw[overlay, ->, thick, red] (box.east) -- ++(2.2,0);
\end{tikzpicture}
and this text is not pushed aside by the arrow.Full document
\documentclass[border=4pt]{standalone}
\usepackage{tikz}
\begin{document}
Text before
\begin{tikzpicture}[baseline=(box.base)]
  \node[draw, fill=yellow!40] (box) {box};
  % overlay: drawn, but not counted in the picture's size
  \draw[overlay, ->, thick, red] (box.east) -- ++(2.2,0);
\end{tikzpicture}
and this text is not pushed aside by the arrow.
\end{document}Drawing across text and pages: remember picture + overlay
The main reason overlay exists is to connect nodes in different pictures: highlight words in a paragraph or an equation and draw arrows between them. The manual’s recipe has three steps:
- Give
remember pictureto every picture that contains a node you want to reference, and to the picture that references it. - Give
overlayto the paths (or the whole picture) that point into other pictures. Without it TikZ enlarges the referencing picture to include the far-away node, which moves the page content, so the position changes again on the next run and the picture grows every time. - Compile twice. TikZ writes the position of each remembered picture to the
.auxfile and can only read it on the next run. On the first run the other node is treated as if it were in the current picture, so the arrow lands in the wrong place.latexmkand Overleaf rerun automatically when the.auxfile changes; the LabCanvas renderer did the second run for the picture below. Position tracking needs a PDF engine (pdfLaTeX, LuaLaTeX, XeLaTeX);latex+dvipscannot do it.
The special node current page uses the same mechanism to place things at absolute positions on the page, such as a watermark or a logo in a corner:
\begin{tikzpicture}[remember picture, overlay]
  \node[rotate=45, scale=6, text opacity=.15] at (current page.center) {DRAFT};
  \node[anchor=north east, xshift=-1cm, yshift=-1cm]
    at (current page.north east) {\includegraphics[width=2cm]{logo}};
\end{tikzpicture}
We do not show a picture of this one on purpose: our pictures are made with the standalone class, which crops the page to its content, and there current page does not match the cropped page, so the drawing lands outside it. In an article, report or Beamer document, it is placed on the page as expected (after the second run).
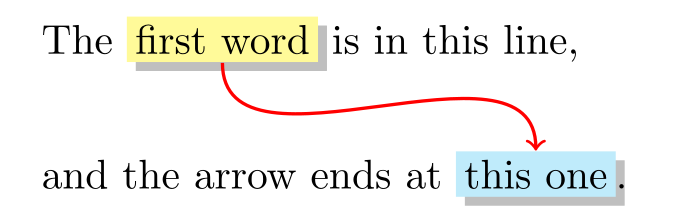
\usepackage{tikz} \usetikzlibrary{shadows}% any text of your document; the tabular only keeps this example on two lines
\begin{tabular}{l}
The \tikz[remember picture, baseline=(a.base)]
\node[fill=yellow!40, inner sep=2pt, drop shadow] (a) {first word}; is in this line,\\[7mm]
and the arrow ends at \tikz[remember picture, baseline=(b.base)]
\node[fill=cyan!25, inner sep=2pt, drop shadow] (b) {this one};.
\end{tabular}
\begin{tikzpicture}[remember picture, overlay]
\draw[->, thick, red] (a.south) to[out=-90, in=90] (b.north);
\end{tikzpicture}Full document
\documentclass[border=4pt]{standalone}
\usepackage{tikz}
\usetikzlibrary{shadows}
\begin{document}
% any text of your document; the tabular only keeps this example on two lines
\begin{tabular}{l}
  The \tikz[remember picture, baseline=(a.base)]
    \node[fill=yellow!40, inner sep=2pt, drop shadow] (a) {first word}; is in this line,\\[7mm]
  and the arrow ends at \tikz[remember picture, baseline=(b.base)]
    \node[fill=cyan!25, inner sep=2pt, drop shadow] (b) {this one};.
\end{tabular}
\begin{tikzpicture}[remember picture, overlay]
  \draw[->, thick, red] (a.south) to[out=-90, in=90] (b.north);
\end{tikzpicture}
\end{document}Common errors and how to fix them
| LaTeX says (or you see) | Cause and fix |
|---|---|
| Package pgfkeys Error: I do not know the key '/tikz/drop shadow' and I am going to ignore it. Perhaps you misspelled it. | The shadows library is not loaded. Add \usetikzlibrary{shadows} after \usepackage{tikz}. The same message for /tikz/blur shadow means \usetikzlibrary{shadows.blur} is missing. |
| Package tikz Error: I did not find the tikz library 'blur'. I looked for files named tikzlibraryblur.code.tex and pgflibraryblur.code.tex, but neither could be found in the current texmf trees. | The library is called shadows.blur: \usetikzlibrary{shadows.blur}. If that name is not found either, the pgf-blur package is not installed: tlmgr install pgf-blur (TeX Live) or the MiKTeX Console. |
| LaTeX Error: File `pgf-blur.sty' not found. | pgf-blur is loaded as a TikZ library, not as a package: replace \usepackage{pgf-blur} with \usetikzlibrary{shadows.blur}. |
| Package pgfkeys Error: I do not know the key '/tikz/shadow opacity', to which you passed '30', and I am going to ignore it. | shadow opacity (a percentage) belongs to blur shadow only. With drop shadow and the other shadows of the shadows library write drop shadow={opacity=.3}. |
| The shadow is cut off at the right or bottom edge (standalone, externalized pictures, \fbox) | Shadows are not part of the bounding box. End the picture with \path (current bounding box.south east) ++(4pt,-4pt); (adjust to the offset), use \useasboundingbox, or give standalone a larger border. |
| drop shadow on a scope or on the whole tikzpicture has no effect | Shadows work on paths and nodes only. Put drop shadow on each node (through a style), or draw one shadowed background shape behind the group. |
| blur shadow={fill=red} colours the node instead of the shadow | Blurred shadows are always black, and other keys in the braces go to the node itself. Use drop shadow={fill=red!60!black} for a coloured shadow. |
| The remember picture arrow points to the wrong place, or the picture grows on every run | Compile a second time (positions come from the .aux file), use pdfLaTeX, LuaLaTeX or XeLaTeX rather than latex + dvips, and put overlay on every path that refers to a node in another picture. |
Frequently asked questions
How do I add a shadow to a node in TikZ?
Load \usetikzlibrary{shadows} and add drop shadow to the node’s options together with a fill, e.g. \node[draw, fill=white, drop shadow] {Text};. Without the fill the shadow shows through the node.
How do I make a soft or blurred shadow?
Use \usetikzlibrary{shadows.blur} and blur shadow. Tune it with shadow blur radius (default .4ex), shadow opacity (percent, default 40) and shadow blur steps (default 4). For circles, circular drop shadow from the shadows library is also soft.
How do I change the colour, offset or opacity of a TikZ shadow?
Inside the braces: drop shadow={fill=blue!50!black, opacity=.4, shadow xshift=3pt, shadow yshift=-3pt}. To change all shadows at once, define every shadow/.style={…}.
Why is my shadow cut off?
Shadows are drawn with a canvas shift that TikZ does not include in the picture’s bounding box, so cropping (standalone, externalization) cuts them. Add the shadow’s corner to the picture with an invisible \path or enlarge the border.
What does overlay do in TikZ?
It excludes a path, scope or picture from the bounding box: it is drawn but takes no space. With remember picture it lets you draw between nodes in different pictures, or at current page positions, after compiling twice.
Do I really need to compile twice for remember picture?
Yes. The positions of remembered pictures are written to the .aux file on one run and used on the next. latexmk and Overleaf do the extra run for you; when running pdflatex by hand, run it again until the drawing stops moving.
References
- PGF/TikZ manual, §70 Shadows Librarytikz.dev
- PGF/TikZ manual, §70.2 The General Shadow Option (shadow scale, shadow xshift, shadow yshift)tikz.dev
- PGF/TikZ manual, §70.3.1 Drop Shadows and §70.3.2 Copy Shadowstikz.dev
- PGF/TikZ manual, §70.4 Shadows for Special Paths and Nodes (circular drop shadow, circular glow)tikz.dev
- PGF/TikZ manual, §15.10 Doing Multiple Actions on a Path (preaction)tikz.dev
- PGF/TikZ manual, §15.8 Establishing a Bounding Boxtikz.dev
- PGF/TikZ manual, §17.13 Referencing Nodes Outside the Current Picture (remember picture, overlay, current page)tikz.dev
- PGF/TikZ manual, §106.3.2 Referencing Anchors of Nodes in Different Picturestikz.dev
- PGF/TikZ manual, §23.1 Transparency: overview and driver supporttikz.dev
- pgf-blur package on CTAN (shadows.blur library, v1.02)ctan.org
- pgf-blur documentation (PDF)mirrors.ctan.org
- PGF/TikZ on CTAN (v3.1.12)ctan.org
The facts on this page were checked against these sources, and every picture is the code with it typeset with TeX Live 2026. Code on this page: CC0 1.0, copy it freely.
Try the code in your browserEvery snippet on this page opens in the free TikZ editor: it is typeset with TeX Live as you type, with errors pointed at their line.
Open the TikZ editor