TikZ arrows: arrow tips, sizes, curves and labels
Quick answer
\draw[->] (0,0) -- (2,0); puts a tip at the end, <-> at both ends. For other tips, load \usetikzlibrary{arrows.meta} and name the tip: -Stealth, -Latex, -Triangle. Options in square brackets set its size and style, with braces around the tip: -{Stealth[length=3mm, open]}. >=Stealth on the picture changes what every -> draws.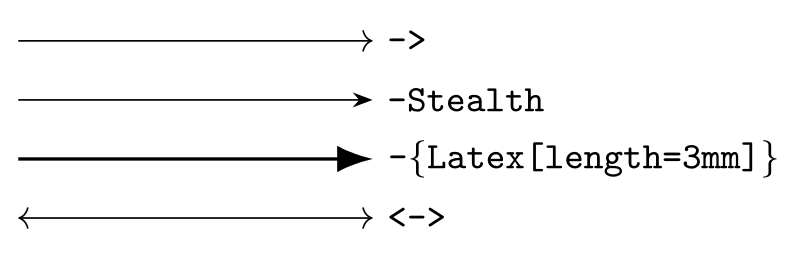
\usepackage{tikz} \usetikzlibrary{arrows.meta}\begin{tikzpicture}[every node/.style={right, font=\ttfamily\small}]
\draw[->] (0,1.5) -- (3,1.5) node {->};
\draw[-Stealth] (0,1) -- (3,1) node {-Stealth};
\draw[thick, -{Latex[length=3mm]}] (0,0.5) -- (3,0.5) node {-\{Latex[length=3mm]\}};
\draw[<->] (0,0) -- (3,0) node {<->};
\end{tikzpicture}Full document
\documentclass[border=4pt]{standalone}
\usepackage{tikz}
\usetikzlibrary{arrows.meta}
\begin{document}
\begin{tikzpicture}[every node/.style={right, font=\ttfamily\small}]
  \draw[->]                      (0,1.5) -- (3,1.5) node {->};
  \draw[-Stealth]                (0,1)   -- (3,1)   node {-Stealth};
  \draw[thick, -{Latex[length=3mm]}] (0,0.5) -- (3,0.5) node {-\{Latex[length=3mm]\}};
  \draw[<->]                     (0,0)   -- (3,0)   node {<->};
\end{tikzpicture}
\end{document}Contents
Arrow syntax: start tip, dash, end tip
An arrow option is the start tip, a dash and the end tip: -> (nothing at the start), <-, <->, ->> (two tips), |<->| (bars for a dimension line), or named tips such as Circle-Latex. Any unknown option that contains a dash is read as an arrow specification; the long form is arrows={->}. The arrow’s length is just the distance between its points: (0,0) -- (3,0) is 3 cm, (0,0) -- ++(30:2) is 2 cm at 30°.
> is a shorthand. Write >=Stealth (or >={Stealth[round]}) in the tikzpicture options and every ->, <-> and ->> in the picture uses that tip, as below; the same line in \tikzset{>=Stealth} sets it for the whole document.
Tips are only drawn when the path has two ends. A rectangle, a circle or a path closed with -- cycle never gets tips, and if a path has several pieces, only the last one gets them. The tip uses only the last segment of the path for its direction, so that segment must be longer than the tip.
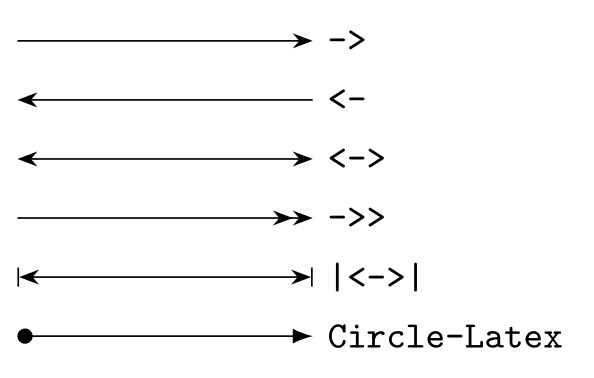
\usepackage{tikz} \usetikzlibrary{arrows.meta}\begin{tikzpicture}[>=Stealth, every node/.style={right, font=\ttfamily\small}]
\draw[->] (0,2.5) -- (2.5,2.5) node {->};
\draw[<-] (0,2) -- (2.5,2) node {<-};
\draw[<->] (0,1.5) -- (2.5,1.5) node {<->};
\draw[->>] (0,1) -- (2.5,1) node {->>};
\draw[|<->|] (0,0.5) -- (2.5,0.5) node {|<->|};
\draw[Circle-Latex] (0,0) -- (2.5,0) node {Circle-Latex};
\end{tikzpicture}Full document
\documentclass[border=4pt]{standalone}
\usepackage{tikz}
\usetikzlibrary{arrows.meta}
\begin{document}
\begin{tikzpicture}[>=Stealth, every node/.style={right, font=\ttfamily\small}]
  \draw[->]           (0,2.5) -- (2.5,2.5) node {->};
  \draw[<-]           (0,2)   -- (2.5,2)   node {<-};
  \draw[<->]          (0,1.5) -- (2.5,1.5) node {<->};
  \draw[->>]          (0,1)   -- (2.5,1)   node {->>};
  \draw[|<->|]        (0,0.5) -- (2.5,0.5) node {|<->|};
  \draw[Circle-Latex] (0,0)   -- (2.5,0)   node {Circle-Latex};
\end{tikzpicture}
\end{document}All the arrow tips of arrows.meta
The arrows.meta library defines the modern arrow tips, all with capitalised names. The manual groups them as barbed (lines only, so filling has no effect: Arc Barb, Bar, Bracket, Hooks, Parenthesis, Straight Barb, Tee Barb), mathematical (Classical TikZ Rightarrow, Computer Modern Rightarrow, Implies for double lines, and To), geometric (filled shapes that also come open: Circle, Diamond, Ellipse, Kite, Latex, Rectangle, Square, Stealth, Triangle, Turned Square), caps for line ends (Butt Cap, Fast Round, Fast Triangle, Round Cap, Triangle Cap) and the special Rays.
The table shows each at its natural size on a thin (0.4pt) line, open, and on a very thick (1.2pt) line. Some details from the sources: To is Computer Modern Rightarrow, the tip of LaTeX’s \to; LaTeX is another spelling of Latex; Triangle is a filled triangle with a 60° tip; Stealth and Latex are 3pt plus 4.5 times the line width long (4.8pt on a 0.4pt line) and three quarters as wide. The table itself is a \foreach loop, which works because the tip name in -{\tip[]} is expanded before it is looked up.
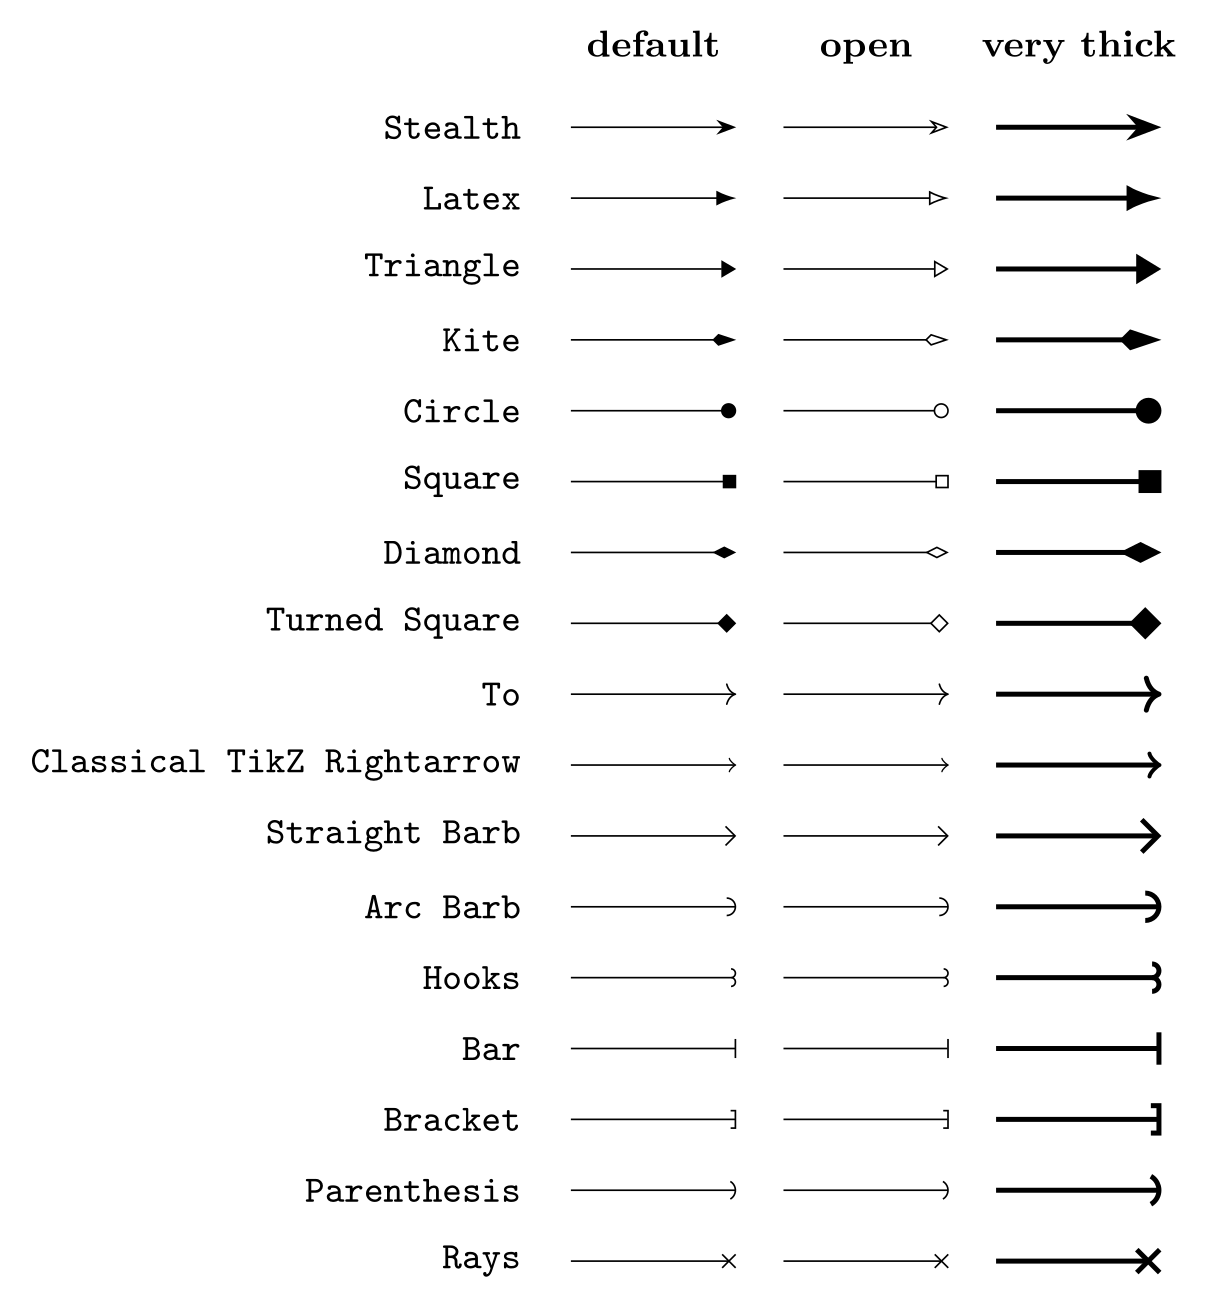
\usepackage{tikz} \usetikzlibrary{arrows.meta}\begin{tikzpicture}[y=-6mm]
\node[font=\small\bfseries, anchor=base] at (1,0) {default};
\node[font=\small\bfseries, anchor=base] at (2.8,0) {open};
\node[font=\small\bfseries, anchor=base] at (4.6,0) {very thick};
\foreach \tip [count=\i] in {Stealth, Latex, Triangle, Kite, Circle, Square, Diamond,
Turned Square, To, Classical TikZ Rightarrow, Straight Barb, Arc Barb, Hooks,
Bar, Bracket, Parenthesis, Rays} {
\node[anchor=east, font=\ttfamily\small] at (0,\i) {\tip};
\draw[-{\tip[]}] (0.3,\i) -- (1.7,\i);
\draw[-{\tip[open]}] (2.1,\i) -- (3.5,\i);
\draw[very thick, -{\tip[]}] (3.9,\i) -- (5.3,\i);
}
\end{tikzpicture}Full document
\documentclass[border=4pt]{standalone}
\usepackage{tikz}
\usetikzlibrary{arrows.meta}
\begin{document}
\begin{tikzpicture}[y=-6mm]
  \node[font=\small\bfseries, anchor=base] at (1,0)   {default};
  \node[font=\small\bfseries, anchor=base] at (2.8,0) {open};
  \node[font=\small\bfseries, anchor=base] at (4.6,0) {very thick};
  \foreach \tip [count=\i] in {Stealth, Latex, Triangle, Kite, Circle, Square, Diamond,
      Turned Square, To, Classical TikZ Rightarrow, Straight Barb, Arc Barb, Hooks,
      Bar, Bracket, Parenthesis, Rays} {
    \node[anchor=east, font=\ttfamily\small] at (0,\i) {\tip};
    \draw[-{\tip[]}]             (0.3,\i) -- (1.7,\i);
    \draw[-{\tip[open]}]         (2.1,\i) -- (3.5,\i);
    \draw[very thick, -{\tip[]}] (3.9,\i) -- (5.3,\i);
  }
\end{tikzpicture}
\end{document}arrows.meta versus the old arrows library
Before PGF 3.0, arrow tips had lowercase names: to, latex and stealth are still built in, and the arrows library added names like triangle 45 and open triangle 60. The manual now calls the arrows and arrows.spaced libraries deprecated: use arrows.meta, which can do everything they did. The old tips still work and can be mixed with the new ones, but they cannot be configured: latex[scale=2] draws the normal size, while Latex[scale=2] doubles it, as the picture shows.
| Old | arrows.meta |
|---|---|
-latex | -Latex |
-stealth | -Stealth |
-to | -To |
-triangle 60, -open triangle 60 | -Triangle, -{Triangle[open]} |
-| | -Bar (| still works) |
One side effect: > means To, and To is the classic TikZ arrow until arrows.meta is loaded, when it becomes Computer Modern Rightarrow. So adding the library slightly changes how a plain -> looks.
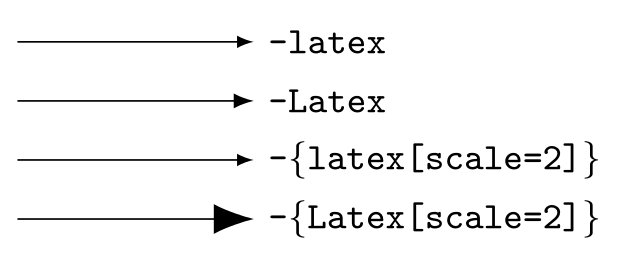
\usepackage{tikz} \usetikzlibrary{arrows.meta}\begin{tikzpicture}[every node/.style={right, font=\ttfamily\small}]
\draw[-latex] (0,1.5) -- (2,1.5) node {-latex};
\draw[-Latex] (0,1) -- (2,1) node {-Latex};
\draw[-{latex[scale=2]}] (0,0.5) -- (2,0.5) node {-\{latex[scale=2]\}};
\draw[-{Latex[scale=2]}] (0,0) -- (2,0) node {-\{Latex[scale=2]\}};
\end{tikzpicture}Full document
\documentclass[border=4pt]{standalone}
\usepackage{tikz}
\usetikzlibrary{arrows.meta}
\begin{document}
\begin{tikzpicture}[every node/.style={right, font=\ttfamily\small}]
  \draw[-latex]            (0,1.5) -- (2,1.5) node {-latex};
  \draw[-Latex]            (0,1)   -- (2,1)   node {-Latex};
  \draw[-{latex[scale=2]}] (0,0.5) -- (2,0.5) node {-\{latex[scale=2]\}};
  \draw[-{Latex[scale=2]}] (0,0)   -- (2,0)   node {-\{Latex[scale=2]\}};
\end{tikzpicture}
\end{document}Arrow size: length, width, scale and line width
Size options go in square brackets after the tip name, and the whole tip then needs braces so that the bracket is not read as the end of the \draw options: -{Stealth[length=4mm]}. length is the distance from the very tip to the back; width is the width across the back. For Stealth and Latex the default width is a fraction of the length, so length alone scales the tip and keeps its shape, while setting both changes the proportions. scale=2 multiplies length, width and inset after everything else (scale length and scale width do one direction).
Tips grow with the line by themselves, because their default sizes include a factor of the line width: line width=2pt or ultra thick gives a larger tip without any tip option. You can use the same mechanism: length=0pt 6 makes the tip exactly six line widths long, whatever the line width. A length given without a factor, like length=4mm, is fixed.
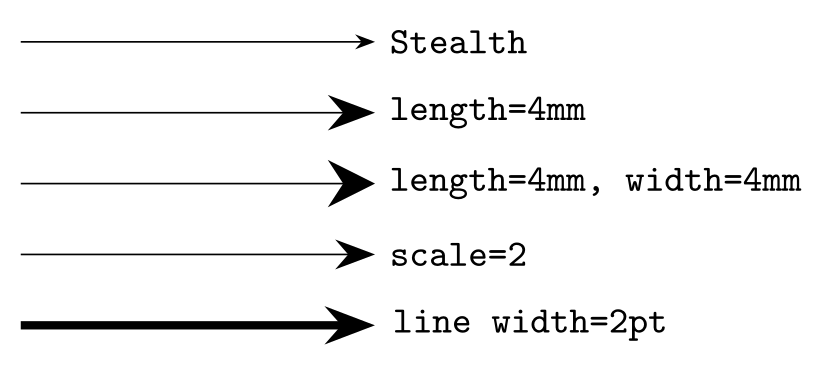
\usepackage{tikz} \usetikzlibrary{arrows.meta}\begin{tikzpicture}[every node/.style={right, font=\ttfamily\small}]
\draw[-Stealth] (0,2.4) -- (3,2.4) node {Stealth};
\draw[-{Stealth[length=4mm]}] (0,1.8) -- (3,1.8) node {length=4mm};
\draw[-{Stealth[length=4mm, width=4mm]}] (0,1.2) -- (3,1.2) node {length=4mm, width=4mm};
\draw[-{Stealth[scale=2]}] (0,0.6) -- (3,0.6) node {scale=2};
\draw[line width=2pt, -Stealth] (0,0) -- (3,0) node {line width=2pt};
\end{tikzpicture}Full document
\documentclass[border=4pt]{standalone}
\usepackage{tikz}
\usetikzlibrary{arrows.meta}
\begin{document}
\begin{tikzpicture}[every node/.style={right, font=\ttfamily\small}]
  \draw[-Stealth]                         (0,2.4) -- (3,2.4) node {Stealth};
  \draw[-{Stealth[length=4mm]}]           (0,1.8) -- (3,1.8) node {length=4mm};
  \draw[-{Stealth[length=4mm, width=4mm]}] (0,1.2) -- (3,1.2) node {length=4mm, width=4mm};
  \draw[-{Stealth[scale=2]}]              (0,0.6) -- (3,0.6) node {scale=2};
  \draw[line width=2pt, -Stealth]         (0,0)   -- (3,0)   node {line width=2pt};
\end{tikzpicture}
\end{document}Arrow tip styles: open, round, fill, colour, harpoon, reversed
More keys in the same brackets change the look: open (a shorthand for fill=none), fill=white, a colour such as red or color=red, round (round line caps and joins in the tip) or sharp, harpoon (only the left half; left, right and swap choose the side), reversed and slant=.3. open and fill=white differ only over a coloured background: the open tip lets it show through. When you give both a colour and a fill, put color first, because it resets the fill.
To reuse a combination, define a style once, for example \tikzset{myarrow/.style={-{Stealth[length=3mm, round]}, thick, blue!70!black}}, and write \draw[myarrow] ….
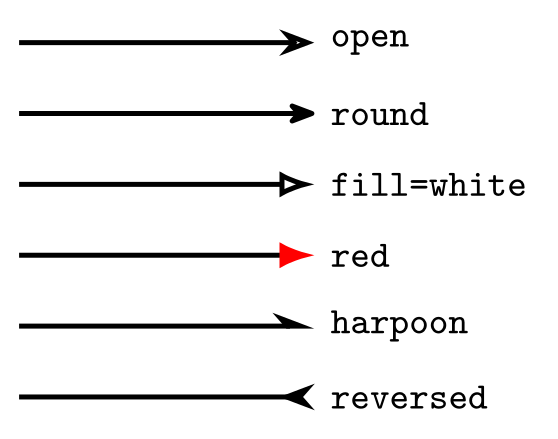
\usepackage{tikz} \usetikzlibrary{arrows.meta}\begin{tikzpicture}[very thick, every node/.style={right, font=\ttfamily\small}]
\draw[-{Stealth[open]}] (0,3) -- (2.5,3) node {open};
\draw[-{Stealth[round]}] (0,2.4) -- (2.5,2.4) node {round};
\draw[-{Latex[fill=white]}] (0,1.8) -- (2.5,1.8) node {fill=white};
\draw[-{Latex[red]}] (0,1.2) -- (2.5,1.2) node {red};
\draw[-{Stealth[harpoon]}] (0,0.6) -- (2.5,0.6) node {harpoon};
\draw[-{Stealth[reversed]}] (0,0) -- (2.5,0) node {reversed};
\end{tikzpicture}Full document
\documentclass[border=4pt]{standalone}
\usepackage{tikz}
\usetikzlibrary{arrows.meta}
\begin{document}
\begin{tikzpicture}[very thick, every node/.style={right, font=\ttfamily\small}]
  \draw[-{Stealth[open]}]     (0,3)   -- (2.5,3)   node {open};
  \draw[-{Stealth[round]}]    (0,2.4) -- (2.5,2.4) node {round};
  \draw[-{Latex[fill=white]}] (0,1.8) -- (2.5,1.8) node {fill=white};
  \draw[-{Latex[red]}]        (0,1.2) -- (2.5,1.2) node {red};
  \draw[-{Stealth[harpoon]}]  (0,0.6) -- (2.5,0.6) node {harpoon};
  \draw[-{Stealth[reversed]}] (0,0)   -- (2.5,0)   node {reversed};
\end{tikzpicture}
\end{document}Curved arrows: bend left, bend right, out and in
to[bend left] instead of -- curves the line to the left of its direction, by 30° unless you give an angle (bend left=45); bend right curves the other way. to[out=90, in=180] sets the angle at which the curve leaves the start and enters the end, and looseness (initially 1) makes the curve wider or tighter. For full control, a Bézier curve .. controls (p) and (q) .. takes the arrow option like any other path.
On a curve, a rigid tip can look slightly off the line. Load the bending library: it makes flex the default, which moves the tip along the curve itself and keeps the curve’s shape, and it adds the bend key, which bends the tip with the curve, as on the circle in the next section.
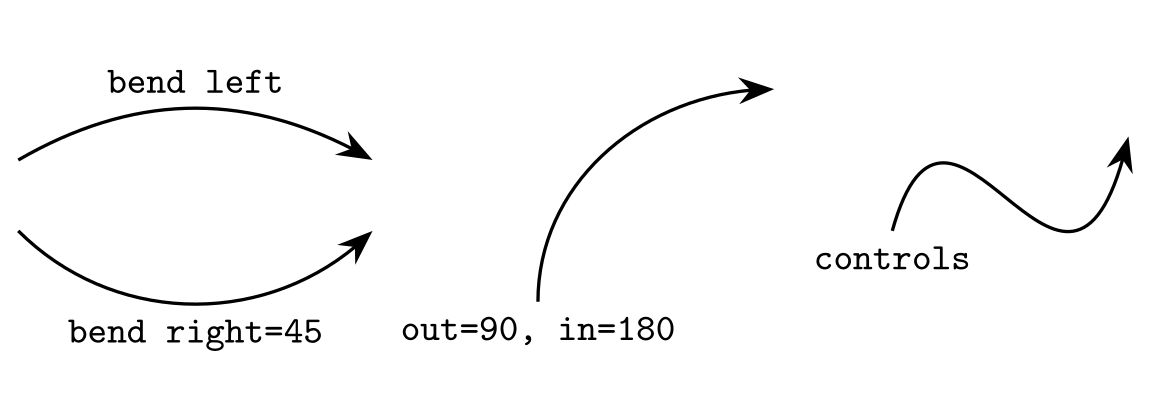
\usepackage{tikz} \usetikzlibrary{arrows.meta, bending}\begin{tikzpicture}[>={Stealth[length=3mm]}, thick,
every node/.style={font=\ttfamily\small}]
\draw[->] (0,0) to[bend left] node[above] {bend left} (3,0);
\draw[->] (0,-0.6) to[bend right=45] node[below] {bend right=45} (3,-0.6);
\draw[->] (4.4,-1.2) to[out=90, in=180] node[pos=0, below] {out=90, in=180} (6.4,0.6);
\draw[->] (7.4,-0.6) .. controls (7.9,1.2) and (8.9,-2) .. node[pos=0, below] {controls}
(9.4,0.2);
\end{tikzpicture}Full document
\documentclass[border=4pt]{standalone}
\usepackage{tikz}
\usetikzlibrary{arrows.meta, bending}
\begin{document}
\begin{tikzpicture}[>={Stealth[length=3mm]}, thick,
                    every node/.style={font=\ttfamily\small}]
  \draw[->] (0,0) to[bend left] node[above] {bend left} (3,0);
  \draw[->] (0,-0.6) to[bend right=45] node[below] {bend right=45} (3,-0.6);
  \draw[->] (4.4,-1.2) to[out=90, in=180] node[pos=0, below] {out=90, in=180} (6.4,0.6);
  \draw[->] (7.4,-0.6) .. controls (7.9,1.2) and (8.9,-2) .. node[pos=0, below] {controls}
            (9.4,0.2);
\end{tikzpicture}
\end{document}Circular arrows and arcs
An arc with a tip makes a rotation arrow: \draw[->] (1,0) arc[start angle=0, end angle=300, radius=1]; starts on the right of a circle of radius 1 around (0,0) and runs counter-clockwise for 300°; an end angle smaller than the start angle runs clockwise. With a double-headed tip on a short arc between two lines you mark an angle. On tight arcs, Stealth[bend] (bending library) curves the tip with the arc.
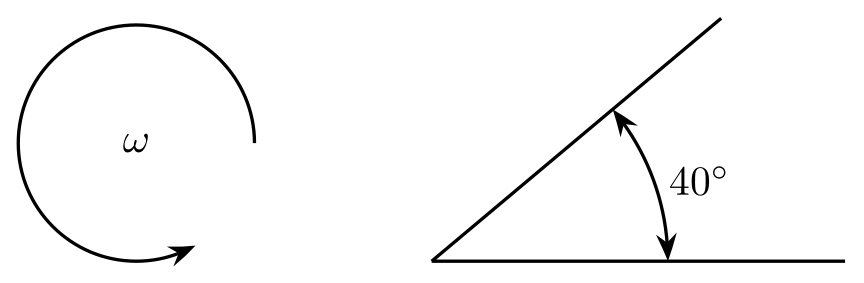
\usepackage{tikz} \usetikzlibrary{arrows.meta, bending}\begin{tikzpicture}[thick]
% a circular arrow: 300 degrees of a circle of radius 1
\draw[-{Stealth[bend]}] (1,0) arc[start angle=0, end angle=300, radius=1];
\node at (0,0) {$\omega$};
% an angle marked with a double-headed arc
\draw (2.5,-1) -- (6,-1) (2.5,-1) -- ++(40:3.2);
\draw[{Stealth[bend]}-{Stealth[bend]}]
(4.5,-1) arc[start angle=0, end angle=40, radius=2] node[midway, right] {$40^\circ$};
\end{tikzpicture}Full document
\documentclass[border=4pt]{standalone}
\usepackage{tikz}
\usetikzlibrary{arrows.meta, bending}
\begin{document}
\begin{tikzpicture}[thick]
  % a circular arrow: 300 degrees of a circle of radius 1
  \draw[-{Stealth[bend]}] (1,0) arc[start angle=0, end angle=300, radius=1];
  \node at (0,0) {$\omega$};
  % an angle marked with a double-headed arc
  \draw (2.5,-1) -- (6,-1)  (2.5,-1) -- ++(40:3.2);
  \draw[{Stealth[bend]}-{Stealth[bend]}]
    (4.5,-1) arc[start angle=0, end angle=40, radius=2] node[midway, right] {$40^\circ$};
\end{tikzpicture}
\end{document}Text above, below or along an arrow
Put a node after -- and it lands halfway: (0,0) -- node[above] {text} (3,0). A node after the end point with midway does the same. pos=0.2 places it at another fraction of the way (0 at the start, 1 at the end), with the names at start, very near start (0.125), near start (0.25), midway, near end (0.75), very near end (0.875) and at end. above, below, left and right move the text off the line, and sloped turns it to follow the line, never upside down. This works on --, curves and to paths alike.
For many labelled edges, auto sets the anchor for you so each label sits beside its line rather than on it (auto=left or auto=right; swap flips the side), and with the quotes library edge["x"] is short for an edge with an auto-placed label, by default on the left.
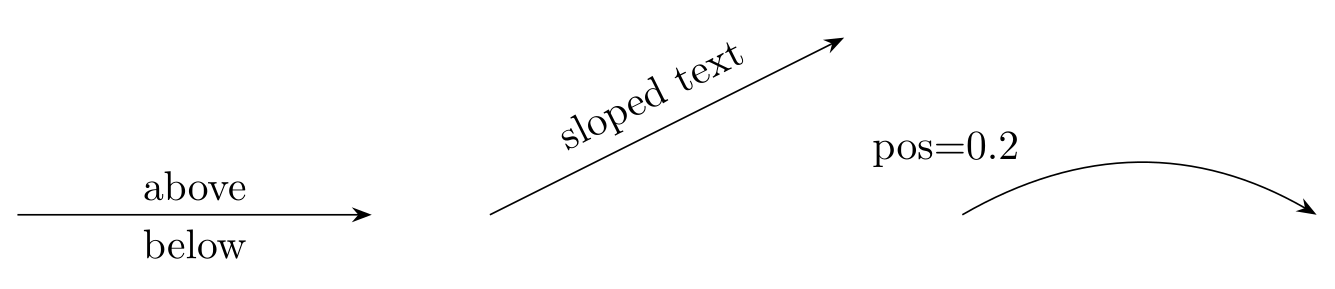
\usepackage{tikz} \usetikzlibrary{arrows.meta}\begin{tikzpicture}[>=Stealth]
\draw[->] (0,0) -- node[above] {above} node[below] {below} (3,0);
\draw[->] (4,0) -- (7,1.5) node[midway, above, sloped] {sloped text};
\draw[->] (8,0) to[bend left] node[pos=0.2, above left] {pos=0.2} (11,0);
\end{tikzpicture}Full document
\documentclass[border=4pt]{standalone}
\usepackage{tikz}
\usetikzlibrary{arrows.meta}
\begin{document}
\begin{tikzpicture}[>=Stealth]
  \draw[->] (0,0) -- node[above] {above} node[below] {below} (3,0);
  \draw[->] (4,0) -- (7,1.5) node[midway, above, sloped] {sloped text};
  \draw[->] (8,0) to[bend left] node[pos=0.2, above left] {pos=0.2} (11,0);
\end{tikzpicture}
\end{document}Arrows between nodes
Draw an arrow from one named node to another and TikZ stops it at their borders: \draw[->] (a) -- (b);. |- goes vertically then horizontally, -| the other way, which suits flowcharts. shorten >=3pt leaves a gap before the end tip (shorten < at the start), and the arrow tip key sep does the same from inside the tip specification.
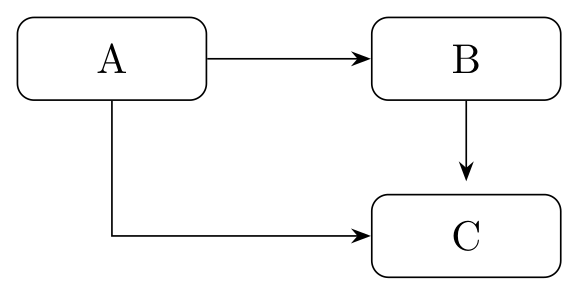
\usepackage{tikz} \usetikzlibrary{arrows.meta}\begin{tikzpicture}[>=Stealth,
box/.style={draw, rounded corners, minimum width=1.6cm, minimum height=7mm}]
\node[box] (a) at (0,0) {A};
\node[box] (b) at (3,0) {B};
\node[box] (c) at (3,-1.5) {C};
\draw[->] (a) -- (b); % ends at the borders
\draw[->] (a) |- (c); % down, then across
\draw[->, shorten >=3pt] (b) -- (c); % a gap before the tip
\end{tikzpicture}Full document
\documentclass[border=4pt]{standalone}
\usepackage{tikz}
\usetikzlibrary{arrows.meta}
\begin{document}
\begin{tikzpicture}[>=Stealth,
    box/.style={draw, rounded corners, minimum width=1.6cm, minimum height=7mm}]
  \node[box] (a) at (0,0)    {A};
  \node[box] (b) at (3,0)    {B};
  \node[box] (c) at (3,-1.5) {C};
  \draw[->] (a) -- (b);                  % ends at the borders
  \draw[->] (a) |- (c);                  % down, then across
  \draw[->, shorten >=3pt] (b) -- (c);   % a gap before the tip
\end{tikzpicture}
\end{document}Big block arrows and thick arrows
A big arrow with text inside is a node shape, not an arrow tip: single arrow and double arrow from the shapes.arrows library. Their size works crosswise to what you might expect: minimum height is the length from tip to tail, and the width is measured across the head. single arrow head extend (initially .5cm) is how far the head sticks out beyond the shaft, single arrow tip angle (initially 90) its point, and single arrow head indent (initially 0cm) a swallow-tail notch; the double arrow has the same keys with double in the name. rotate=90 turns the arrow with its text; shape border rotate=90 with shape border uses incircle turns only the outline.
For a thick line arrow, set line width and, if the automatic tip is not big enough, its size: \draw[line width=4pt, -{Triangle[length=10pt, width=14pt]}].
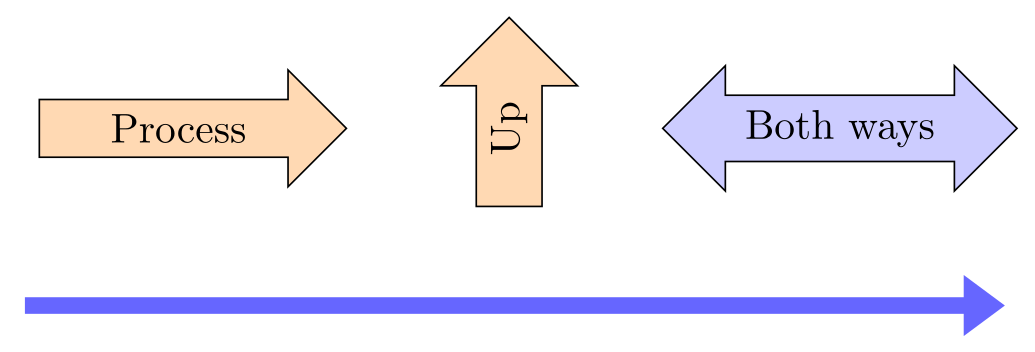
\usepackage{tikz} \usetikzlibrary{arrows.meta, shapes.arrows}\begin{tikzpicture}
% block arrows are node shapes: minimum height is the length, tip to tail
\node[single arrow, draw, fill=orange!30, minimum height=2.6cm] at (0,0) {Process};
\node[single arrow, draw, fill=orange!30, minimum height=1.6cm,
single arrow head extend=3mm, rotate=90] at (2.8,0) {Up};
\node[double arrow, draw, fill=blue!20, minimum height=3cm] at (5.6,0) {Both ways};
% a thick line with a large tip
\draw[line width=4pt, blue!60, -{Triangle[length=10pt, width=14pt]}]
(-1.3,-1.5) -- (7,-1.5);
\end{tikzpicture}Full document
\documentclass[border=4pt]{standalone}
\usepackage{tikz}
\usetikzlibrary{arrows.meta, shapes.arrows}
\begin{document}
\begin{tikzpicture}
  % block arrows are node shapes: minimum height is the length, tip to tail
  \node[single arrow, draw, fill=orange!30, minimum height=2.6cm] at (0,0) {Process};
  \node[single arrow, draw, fill=orange!30, minimum height=1.6cm,
        single arrow head extend=3mm, rotate=90] at (2.8,0) {Up};
  \node[double arrow, draw, fill=blue!20, minimum height=3cm] at (5.6,0) {Both ways};
  % a thick line with a large tip
  \draw[line width=4pt, blue!60, -{Triangle[length=10pt, width=14pt]}]
    (-1.3,-1.5) -- (7,-1.5);
\end{tikzpicture}
\end{document}Squiggly, snake, zigzag and coil arrows
Wavy arrows are decorations from \usetikzlibrary{decorations.pathmorphing}: add decorate, decoration={snake} (or zigzag, coil, random steps, bumps) to the path. amplitude (initially 2.5pt) is how far the line swings out and segment length (initially 10pt) the length of one wave.
The tip takes its direction from the last little segment of the decorated line, which can point anywhere. post length=2mm keeps the last 2 mm straight, so the tip points along the arrow; pre length does the same at the start.
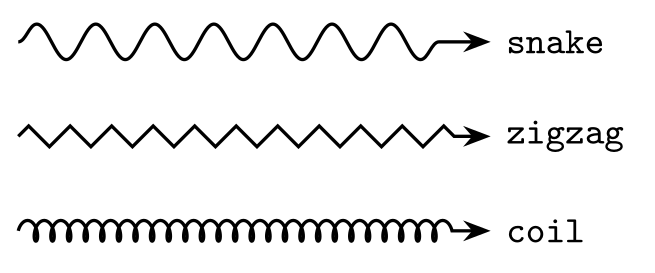
\usepackage{tikz} \usetikzlibrary{arrows.meta, decorations.pathmorphing}\begin{tikzpicture}[>=Stealth, thick, every node/.style={right, font=\ttfamily\small}]
\draw[->, decorate, decoration={snake, amplitude=1.5mm, segment length=5mm,
post length=2mm}] (0,1.6) -- (4,1.6) node {snake};
\draw[->, decorate, decoration={zigzag, post length=2mm}]
(0,0.8) -- (4,0.8) node {zigzag};
\draw[->, decorate, decoration={coil, segment length=4pt, post length=2mm}]
(0,0) -- (4,0) node {coil};
\end{tikzpicture}Full document
\documentclass[border=4pt]{standalone}
\usepackage{tikz}
\usetikzlibrary{arrows.meta, decorations.pathmorphing}
\begin{document}
\begin{tikzpicture}[>=Stealth, thick, every node/.style={right, font=\ttfamily\small}]
  \draw[->, decorate, decoration={snake, amplitude=1.5mm, segment length=5mm,
        post length=2mm}] (0,1.6) -- (4,1.6) node {snake};
  \draw[->, decorate, decoration={zigzag, post length=2mm}]
        (0,0.8) -- (4,0.8) node {zigzag};
  \draw[->, decorate, decoration={coil, segment length=4pt, post length=2mm}]
        (0,0) -- (4,0) node {coil};
\end{tikzpicture}
\end{document}Common errors and how to fix them
| LaTeX says (or you see) | Cause and fix |
|---|---|
| Package pgf Error: Unknown arrow tip kind 'Stealth'. | Stealth, Latex, Triangle and the other capitalised tips are in a library: add \usetikzlibrary{arrows.meta} to the preamble. |
| Package pgfkeys Error: I do not know the key 'length[' and I am going to ignore it. Perhaps you misspelled it. | A tip with options was written without braces, as in \draw[-Stealth[length=3mm]]. Put braces around the tip: \draw[-{Stealth[length=3mm]}]. |
| Package pgf Error: Unknown arrow tip kind 'triangle 45'. | A tip name from the deprecated arrows library. Use the arrows.meta tip instead (Triangle, with angle=45:… if you need that angle), or load \usetikzlibrary{arrows} for old code. |
| Package pgfkeys Error: I do not know the key '/tikz/single arrow' and I am going to ignore it. Perhaps you misspelled it. | Block arrows are node shapes in a library: add \usetikzlibrary{shapes.arrows}. |
| Package tikz Error: You need to load a decoration library. | decorate with snake, zigzag or coil needs \usetikzlibrary{decorations.pathmorphing}. |
| No arrow tip appears (no error) | Tips are never drawn on closed paths: rectangle, circle or anything ending in -- cycle. They also need the path to be drawn (\draw, not \path or \fill). Draw the line to have a tip as its own open path. |
| The tip on a snake or zigzag points sideways | The tip follows the last tiny segment of the decoration. Add post length=2mm to the decoration so the line ends straight. |
Frequently asked questions
How do I change the arrow head in TikZ?
Load \usetikzlibrary{arrows.meta} and name the tip in the arrow option, such as \draw[-Stealth] or \draw[-{Latex[open]}]. To change the tip of every -> in a picture, put >=Stealth in the tikzpicture options, or \tikzset{>=Stealth} in the preamble for the whole document.
How do I make a TikZ arrow head bigger?
Give the tip a size in brackets, with braces around it: -{Stealth[length=4mm]}, -{Stealth[length=4mm, width=3mm]} or -{Stealth[scale=2]}. A thicker line also makes the default tips bigger, because their size includes a multiple of the line width. Old lowercase tips such as latex cannot be resized; use Latex.
How do I draw a curved arrow in TikZ?
Replace -- by a to path with a bend: \draw[->] (0,0) to[bend left] (3,0); curves by 30 degrees, bend left=60 more. to[out=90, in=180] sets the leaving and arriving angles, and arc draws part of a circle. Load the bending library for tips that follow the curve.
How do I write text above an arrow in TikZ?
Put a node in the middle of the path: \draw[->] (0,0) -- node[above] {text} (3,0);. Use below, left or right for other sides, pos=0.25 to move it along the arrow, and sloped to rotate the text along a slanted or curved arrow.
What is the difference between the arrows and arrows.meta libraries?
arrows is the old library (lowercase names like triangle 45) and is deprecated; arrows.meta is its replacement, with capitalised names (Stealth, Latex, Triangle) whose size, colour, fill and shape can be set with options. Both can be loaded together, but only arrows.meta tips respond to options such as scale or length.
How do I draw a double-headed or double-line arrow?
For tips at both ends use <-> or name both tips, as in Stealth-Stealth. For a double line like an implication arrow, combine the double option with the Implies tip: \draw[double, -Implies] (0,0) -- (2,0);. For a big block arrow pointing both ways, use the double arrow shape from shapes.arrows.
References
- PGF/TikZ manual, §16.2 Where and When Arrow Tips Are Placedtikz.dev
- PGF/TikZ manual, §16.3 Arrow Keys: size, scaling, colouring, line styling, bendingtikz.dev
- PGF/TikZ manual, §16.4 Arrow Tip Specifications (syntax, shorthands, the > key)tikz.dev
- PGF/TikZ manual, §16.5 Reference: Arrow Tips (arrows.meta)tikz.dev
- PGF/TikZ manual, §42 Arrow Tip Library (the deprecated arrows library)tikz.dev
- PGF/TikZ manual, §74.3 To Path Library: Curves (bend left, out, in, looseness)tikz.dev
- PGF/TikZ manual, §17.8 Placing Nodes on a Line or Curve Explicitly (pos, midway, sloped)tikz.dev
- PGF/TikZ manual, §71.5 Arrow Shapes (single arrow, double arrow)tikz.dev
- PGF/TikZ manual, §50.3 Path Morphing Decorations (snake, zigzag, coil)tikz.dev
- PGF/TikZ manual, §24.4.2 Starting and Ending Decorations Early or Late (pre and post length)tikz.dev
- pgf package (TikZ) on CTAN, with the full manual as PDFctan.org
The facts on this page were checked against these sources, and every picture is the code with it typeset with TeX Live 2026. Code on this page: CC0 1.0, copy it freely.
Try the code in your browserEvery snippet on this page opens in the free TikZ editor: it is typeset with TeX Live as you type, with errors pointed at their line.
Open the TikZ editor