tikz-timing: digital timing diagrams in LaTeX
Quick answer
\usepackage{tikz-timing} and write one signal per row of a tikztimingtable: Name & characters \\. Each letter draws one period: H high, L low, Z high impedance, X undefined, D{A} a data value, and c a clock half-period, so 16{c} is eight clock cycles. A number in front sets the width (2.5H), braces repeat (3{HL}), and lower-case letters are half as wide. Code after \extracode is added to the same TikZ picture, for grid lines or arrows between signals; \texttiming{HLHL} puts a small diagram into running text.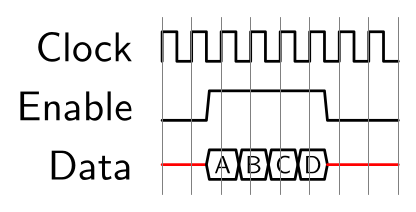
\usepackage{tikz} \usepackage{tikz-timing}\begin{tikztimingtable}
Clock & [L] 16{c} \\
Enable & 1.5L 4H 2.5L \\
Data & 1.5X D{A} D{B} D{C} D{D} 2.5X \\
\extracode
\vertlines[help lines]{}
\end{tikztimingtable}Full document
\documentclass[border=4pt]{standalone}
\usepackage{tikz}
\usepackage{tikz-timing}
\begin{document}
\begin{tikztimingtable}
  Clock  & [L] 16{c}                       \\
  Enable & 1.5L 4H 2.5L                    \\
  Data   & 1.5X D{A} D{B} D{C} D{D} 2.5X   \\
\extracode
  \vertlines[help lines]{}
\end{tikztimingtable}
\end{document}Contents
Loading tikz-timing
tikz-timing, by Martin Scharrer, is on CTAN and in TeX Live and MiKTeX. Its current version is 0.7f of 20 December 2017; the package has had no release since, and the last repository commits (October 2022) only updated the licence files and URLs. It is stable and works on current TeX Live: every picture on this page was compiled with TeX Live 2026 and PGF 3.1.12.
\usepackage{tikz-timing} loads TikZ. Less common characters come from tikz-timing’s own libraries, loaded after the package with \usetikztiminglibrary{arrows} (several at once: \usetikztiminglibrary{arrows,either}, options in brackets: \usetikztiminglibrary[rising arrows]{clockarrows}). The libraries are arrows, either, overlays, clockarrows, columntype, nicetabs, counters, advnodes, ifsym, and the experimental interval and beamer (manual §4).
The timing characters: H, L, Z, X, D, U, C, T, M, G, S
A diagram line is a string of characters, each drawing one period of a logic level and the transition into it (manual §2.1):
| Character | Meaning |
|---|---|
H, L | Logic high, logic low |
Z | High impedance (a middle line, blue by default) |
X | Undefined or don’t care (red by default) |
D, D{text} | Data: a double line, optionally with a value written inside; D{}D forces a transition between two values |
U | Unknown data (filled grey) |
C | Clock: toggles the level, with vertical edges |
T | Toggle: like C but with sloped edges |
M | Metastable (a zig-zag) |
G | Glitch of zero width |
S | Space: nothing is drawn |
The modifiers are what make the syntax compact:
- Width. A number in front sets the width in periods:
2.5H. A run of the same letter merges, soHHHequals3H. - Half width. A lower-case letter is half as wide:
h,3l(1.5 periods). - Repetition. A number before braces repeats:
4{hl}. This is why a clock is written8{c}:8Cwould be a single toggle eight periods long (and8cone of four).CandTdo not merge, soCCCCalso gives four toggles. - Initial level.
[L]at the start of a row (or\texttiming[L]{…}) sets the level before the first character, so the row starts with a transition;[L] 16{c}is a clock that rises at time 0. - Styles inside the string.
HH [blue] LLcolours the rest of the path;;starts a new path, ending the effect, and{…}limits it to a group. - Nodes.
N(a)places a named coordinate at that point of the signal, for arrows and markers (below).
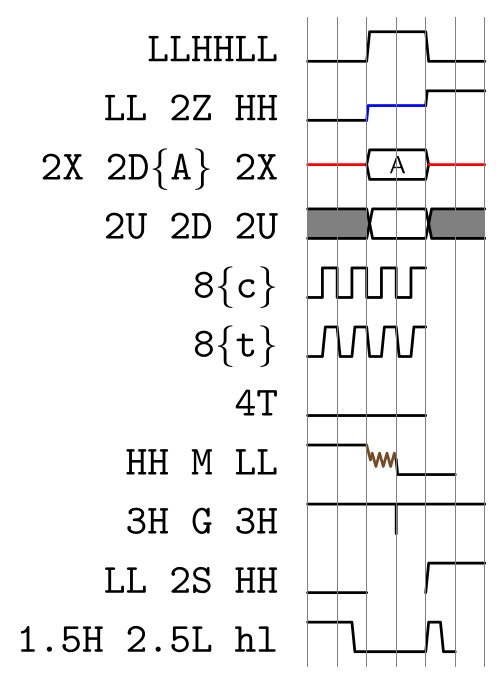
\usepackage{tikz} \usepackage{tikz-timing}\begin{tikztimingtable}
% left: the characters as typed, right: what they draw
\texttt{LLHHLL} & LLHHLL \\
\texttt{LL 2Z HH} & LL 2Z HH \\
\texttt{2X 2D\{A\} 2X} & 2X 2D{A} 2X \\
\texttt{2U 2D 2U} & 2U 2D 2U \\
\texttt{8\{c\}} & 8{c} \\
\texttt{8\{t\}} & 8{t} \\
\texttt{4T} & 4T \\
\texttt{HH M LL} & HH M LL \\
\texttt{3H G 3H} & 3H G 3H \\
\texttt{LL 2S HH} & LL 2S HH \\
\texttt{1.5H 2.5L hl} & 1.5H 2.5L hl \\
\extracode
\vertlines[help lines]{}
\end{tikztimingtable}Full document
\documentclass[border=4pt]{standalone}
\usepackage{tikz}
\usepackage{tikz-timing}
\begin{document}
\begin{tikztimingtable}
  % left: the characters as typed, right: what they draw
  \texttt{LLHHLL}              & LLHHLL          \\
  \texttt{LL 2Z HH}            & LL 2Z HH        \\
  \texttt{2X 2D\{A\} 2X}       & 2X 2D{A} 2X     \\
  \texttt{2U 2D 2U}            & 2U 2D 2U        \\
  \texttt{8\{c\}}              & 8{c}            \\
  \texttt{8\{t\}}              & 8{t}            \\
  \texttt{4T}                  & 4T              \\
  \texttt{HH M LL}             & HH M LL         \\
  \texttt{3H G 3H}             & 3H G 3H         \\
  \texttt{LL 2S HH}            & LL 2S HH        \\
  \texttt{1.5H 2.5L hl}        & 1.5H 2.5L hl    \\
\extracode
  \vertlines[help lines]{}
\end{tikztimingtable}
\end{document}Inline timing diagrams with \texttiming
\texttiming{characters} typesets one diagram line in running text. Its height is that of a capital letter in the current font, so it scales with \small or \Large. The optional argument is either one initial character, \texttiming[L]{H} for a rising edge, or TikZ options, \texttiming[blue, timing/initchar=L]{HLH}. Inside a tikzpicture use \timing at (x,y) {characters}; instead, with the initial character inside the braces: \timing at (0,0) {[L]HLH};. \timing exists only inside a picture or a timing table.

\usepackage{tikz} \usepackage{tikz-timing}\begin{minipage}{8cm}
A rising strobe \texttiming[L]{H} latches the bus
\texttiming{X 3D{data} X} into the register; a full
cycle looks like \texttiming{LLHHHLL}.
The size follows the font:
{\small\texttiming{4{c}}} {\Large\texttiming{4{c}}}.
\end{minipage}Full document
\documentclass[border=4pt]{standalone}
\usepackage{tikz}
\usepackage{tikz-timing}
\begin{document}
\begin{minipage}{8cm}
  A rising strobe \texttiming[L]{H} latches the bus
  \texttiming{X 3D{data} X} into the register; a full
  cycle looks like \texttiming{LLHHHLL}.
  The size follows the font:
  {\small\texttiming{4{c}}} {\Large\texttiming{4{c}}}.
\end{minipage}
\end{document}tikztimingtable: several signals, grid lines and headers
The tikztimingtable environment is a two-column table: the signal name, &, the characters, \\. Every row ends with \\, including the last one before \extracode. Names are typeset in text mode and, by default, in sans-serif (the table style sets font=\sffamily), so an underscore needs escaping (RST\_N) and an active-low bar is $\overline{\textsf{RD}}$. Options on the environment apply to the whole table: timing/slope=0.2 (steeper or flatter edges), timing/rowdist=3 (distance between rows, default 2 signal heights), timing/coldist, timing/xunit and timing/yunit (scale: plain scale does not scale line widths and text correctly).
After \extracode you can draw with ordinary TikZ commands in the table’s coordinate system: one period is one unit in x, the first row sits at y = 0 and each further row 2 units lower. The extracode helpers (manual §2.4):
\vertlines[help lines]{}vertical lines at every period (or at a list such as{3,...,10});\horlines{}horizontal lines.\tablegrida grid behind each row,\fulltablegridone grid behind all rows.\tableheader{Signal}{Waveform}a header row, and\tablerulesbooktabs-style rules above, below and under the header.\begin{background} … \end{background}draws behind the signals.\nrows,\twidth,\rowdist,\coldisthold the table’s size. Rows are nodes namedrow1,row2, … and labelslabel1, …
The counters library used below defines a character that writes an incrementing value into a data field each time it is used: timing/counter/new={char=Q, base=16, reset char=R}, then 1R sets the counter to 1 and 7{Q} draws seven values.
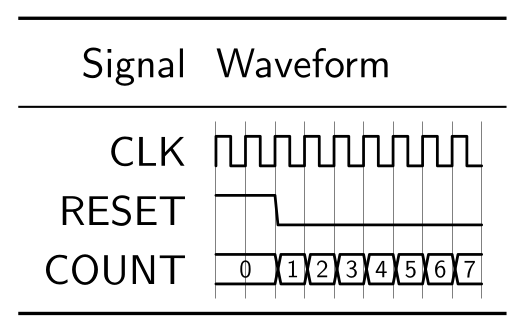
\usepackage{tikz} \usepackage{tikz-timing} \usetikztiminglibrary{counters}\begin{tikztimingtable}[timing/counter/new={char=Q, base=16, reset char=R}]
CLK & [L] 18{c} \\
RESET & 2H 7L \\
COUNT & 2D{0} 1R 7{Q} \\
\extracode
\tableheader{Signal}{Waveform}
\tablerules
\begin{background}[help lines]
\vertlines{}
\end{background}
\end{tikztimingtable}Full document
\documentclass[border=4pt]{standalone}
\usepackage{tikz}
\usepackage{tikz-timing}
\usetikztiminglibrary{counters}
\begin{document}
\begin{tikztimingtable}[timing/counter/new={char=Q, base=16, reset char=R}]
  CLK    & [L] 18{c}             \\
  RESET  & 2H 7L                 \\
  COUNT  & 2D{0} 1R 7{Q}         \\
\extracode
  \tableheader{Signal}{Waveform}
  \tablerules
  \begin{background}[help lines]
    \vertlines{}
  \end{background}
\end{tikztimingtable}
\end{document}Buses and data values
A bus is a D line with the value written inside: 3D{1F40} 3D{1F41} draws two consecutive values with a crossing between them. Surround it with X where the bus is invalid and Z where nobody drives it. timing/d/background/.style={fill=cyan!12} fills every data field, and timing/d/text/.style or timing/text format=\strut formats the values. A value too wide for its field is not shortened: give the D more periods or a smaller font.
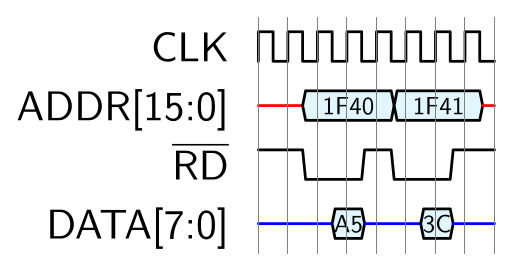
\usepackage{tikz} \usepackage{tikz-timing}\begin{tikztimingtable}[timing/d/background/.style={fill=cyan!12}]
CLK & [L] 16{c} \\
ADDR[15:0] & 1.5X 3D{1F40} 3D{1F41} 0.5X \\
$\overline{\textsf{RD}}$ & 1.5H 2L H 2L 1.5H \\
DATA[7:0] & 2.5Z D{A5} 2Z D{3C} 1.5Z \\
\extracode
\vertlines[help lines]{}
\end{tikztimingtable}Full document
\documentclass[border=4pt]{standalone}
\usepackage{tikz}
\usepackage{tikz-timing}
\begin{document}
\begin{tikztimingtable}[timing/d/background/.style={fill=cyan!12}]
  CLK                       & [L] 16{c}                    \\
  ADDR[15:0]                & 1.5X 3D{1F40} 3D{1F41} 0.5X  \\
  $\overline{\textsf{RD}}$  & 1.5H 2L H 2L 1.5H            \\
  DATA[7:0]                 & 2.5Z D{A5} 2Z D{3C} 1.5Z     \\
\extracode
  \vertlines[help lines]{}
\end{tikztimingtable}
\end{document}Arrows between signals: nodes and the advnodes library
To draw cause and effect between edges, name the transitions with N(name) and connect the names in \extracode. With the advnodes library (\usetikztiminglibrary{advnodes}) each such node has anchors on the signal: .low, .mid and .high on the transition itself, and .LOW, .MID, .HIGH, .TOP and .BOTTOM at the start of the transition, which line up across rows (manual §4.8). The four-phase handshake below connects REQ↑ → ACK↑ → REQ↓ → ACK↓ with curved TikZ arrows.
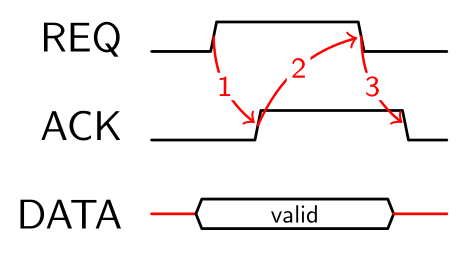
\usepackage{tikz} \usepackage{tikz-timing} \usetikztiminglibrary{advnodes}\begin{tikztimingtable}[timing/slope=0.2, timing/rowdist=3]
REQ & 2L N(r1) 5H N(r2) 3L \\
ACK & 3.5L N(a1) 5H N(a2) 1.5L \\
DATA & 1.5X 6.5D{valid} 2X \\
\extracode
\begin{scope}[->, red, semithick, shorten >=1pt,
every node/.style={fill=white, inner sep=1pt, font=\scriptsize}]
\draw (r1.mid) to[bend right=25] node {1} (a1.mid);
\draw (a1.mid) to[bend left=25] node {2} (r2.mid);
\draw (r2.mid) to[bend right=25] node {3} (a2.mid);
\end{scope}
\end{tikztimingtable}Full document
\documentclass[border=4pt]{standalone}
\usepackage{tikz}
\usepackage{tikz-timing}
\usetikztiminglibrary{advnodes}
\begin{document}
\begin{tikztimingtable}[timing/slope=0.2, timing/rowdist=3]
  REQ  & 2L N(r1) 5H N(r2) 3L       \\
  ACK  & 3.5L N(a1) 5H N(a2) 1.5L   \\
  DATA & 1.5X 6.5D{valid} 2X        \\
\extracode
  \begin{scope}[->, red, semithick, shorten >=1pt,
                every node/.style={fill=white, inner sep=1pt, font=\scriptsize}]
    \draw (r1.mid) to[bend right=25] node {1} (a1.mid);
    \draw (a1.mid) to[bend left=25]  node {2} (r2.mid);
    \draw (r2.mid) to[bend right=25] node {3} (a2.mid);
  \end{scope}
\end{tikztimingtable}
\end{document}Marker lines and timing parameters (setup and hold)
The same nodes give exact positions for measurements. A dashed line from (c.TOP) down to (c.TOP |- h.BOTTOM) marks the clock edge across both rows, and <-> arrows between the data transitions and that line show the setup time tsu and hold time th. ([yshift=-5pt]s.BOTTOM) moves a point down without the calc library.
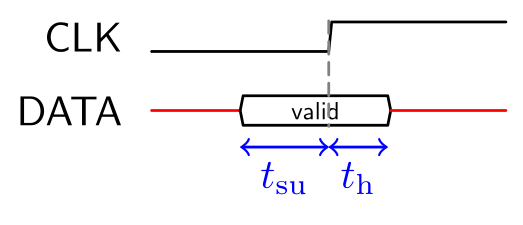
\usepackage{tikz} \usepackage{tikz-timing} \usetikztiminglibrary{advnodes}\begin{tikztimingtable}[timing/rowdist=2.5]
CLK & 6L N(c) 6H \\
DATA & 3X N(s) 5D{valid} N(h) 4X \\
\extracode
\draw[densely dashed, gray] (c.TOP) -- (c.TOP |- h.BOTTOM);
\draw[<->, blue] ([yshift=-5pt]s.BOTTOM) -- node[below] {$t_\mathrm{su}$}
([yshift=-5pt]s.BOTTOM -| c.TOP);
\draw[<->, blue] ([yshift=-5pt]h.BOTTOM -| c.TOP) -- node[below] {$t_\mathrm{h}$}
([yshift=-5pt]h.BOTTOM);
\end{tikztimingtable}Full document
\documentclass[border=4pt]{standalone}
\usepackage{tikz}
\usepackage{tikz-timing}
\usetikztiminglibrary{advnodes}
\begin{document}
\begin{tikztimingtable}[timing/rowdist=2.5]
  CLK  & 6L N(c) 6H                    \\
  DATA & 3X N(s) 5D{valid} N(h) 4X     \\
\extracode
  \draw[densely dashed, gray] (c.TOP) -- (c.TOP |- h.BOTTOM);
  \draw[<->, blue] ([yshift=-5pt]s.BOTTOM) -- node[below] {$t_\mathrm{su}$}
                   ([yshift=-5pt]s.BOTTOM -| c.TOP);
  \draw[<->, blue] ([yshift=-5pt]h.BOTTOM -| c.TOP) -- node[below] {$t_\mathrm{h}$}
                   ([yshift=-5pt]h.BOTTOM);
\end{tikztimingtable}
\end{document}Example: an SPI transfer
An SPI mode-0 byte: chip select low for the whole transfer, the clock idle low with eight pulses, and MOSI and MISO changing on the falling edges so that each bit is stable at the rising edge where it is sampled. The bits sit half a period early (2.5Z D{7} …) against the clock 3L 16{c} 3L, whose first rising edge is at 3. The manual’s Example 9 draws all four SPI modes with the counters library.
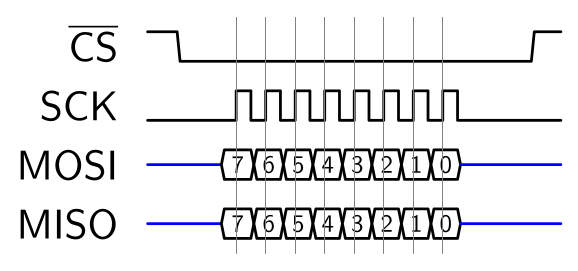
\usepackage{tikz} \usepackage{tikz-timing}\begin{tikztimingtable}[timing/d/background/.style={fill=white}]
$\overline{\textsf{CS}}$ & H 12L H \\
SCK & 3L 16{c} 3L \\
MOSI & 2.5Z D{7} D{6} D{5} D{4} D{3} D{2} D{1} D{0} 3.5Z \\
MISO & 2.5Z D{7} D{6} D{5} D{4} D{3} D{2} D{1} D{0} 3.5Z \\
\extracode
% sample on the rising edges of SCK (SPI mode 0)
\vertlines[help lines]{3,...,10}
\end{tikztimingtable}Full document
\documentclass[border=4pt]{standalone}
\usepackage{tikz}
\usepackage{tikz-timing}
\begin{document}
\begin{tikztimingtable}[timing/d/background/.style={fill=white}]
  $\overline{\textsf{CS}}$ & H 12L H                                         \\
  SCK                      & 3L 16{c} 3L                                     \\
  MOSI                     & 2.5Z D{7} D{6} D{5} D{4} D{3} D{2} D{1} D{0} 3.5Z \\
  MISO                     & 2.5Z D{7} D{6} D{5} D{4} D{3} D{2} D{1} D{0} 3.5Z \\
\extracode
  % sample on the rising edges of SCK (SPI mode 0)
  \vertlines[help lines]{3,...,10}
\end{tikztimingtable}
\end{document}Libraries: clock arrows, edge arrows and uncertain transitions
clockarrowsmarks clock edges onC-to-Ctransitions; optionsrising arrows,falling arrows,dual arrows,no arrows(default), set at loading or astiming/c/rising arrows.arrowsaddsAandW, up and down arrows of zero width for events (the width you give becomes space after the arrow).eitheraddsE, a transition that may happen anywhere in its width:L 2{E} H.overlaysaddsO{…}to draw alternative waveforms on top of each other;columntypegives aTcolumn for ordinary tabulars;nicetabsformats tables like booktabs.
Without its library, a character such as A is not an error: it silently draws nothing.
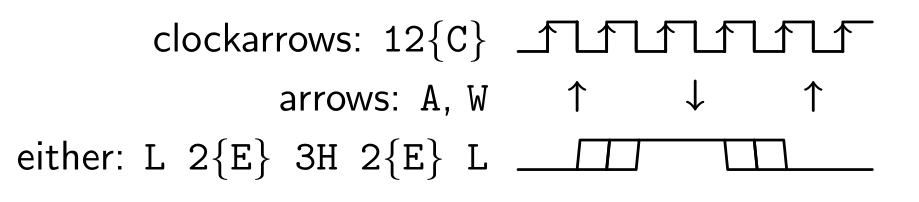
\usepackage{tikz} \usepackage{tikz-timing} \usetikztiminglibrary[rising arrows]{clockarrows} \usetikztiminglibrary{arrows,either}\begin{tikztimingtable}
clockarrows: \texttt{12\{C\}} & 12{C} \\
arrows: \texttt{A}, \texttt{W} & 2S A 3S W 3S A 2S \\
either: \texttt{L 2\{E\} 3H 2\{E\} L} & 2L 2{E} 3H 2{E} 3L \\
\end{tikztimingtable}Full document
\documentclass[border=4pt]{standalone}
\usepackage{tikz}
\usepackage{tikz-timing}
\usetikztiminglibrary[rising arrows]{clockarrows}
\usetikztiminglibrary{arrows,either}
\begin{document}
\begin{tikztimingtable}
  clockarrows: \texttt{12\{C\}}     & 12{C}                \\
  arrows: \texttt{A}, \texttt{W}    & 2S A 3S W 3S A 2S    \\
  either: \texttt{L 2\{E\} 3H 2\{E\} L} & 2L 2{E} 3H 2{E} 3L \\
\end{tikztimingtable}
\end{document}Alternatives and editors
For one-off waveforms you can also draw with plain TikZ paths (\draw (0,0) -- (1,0) -- (1.1,1) -- …), but tikz-timing’s letters are much shorter to write and to change. Many engineers write WaveDrom JSON for documentation; it is drawn by its own JavaScript renderer, not by LaTeX, so a LaTeX document can only include it as an image, while tikz-timing stays editable text in your source. To edit tikz-timing code with an instant preview, use the LabCanvas TikZ editor, which compiles with TeX Live 2026 like the pictures on this page.
Common errors and how to fix them
| LaTeX says (or you see) | Cause and fix |
|---|---|
| LaTeX Error: Environment tikztimingtable undefined. | Add \usepackage{tikz-timing} to the preamble. |
| Undefined control sequence. (at \timing) | \timing is defined only inside a tikzpicture or tikztimingtable. In running text use \texttiming{…}. |
| Undefined control sequence. (at \usetikztiminglibrary) | The library command comes from the package: load \usepackage{tikz-timing} first, then \usetikztiminglibrary{…}. |
| File ended while scanning use of \tikztimingtable@row. | The last row before \extracode has no \\. End every row with \\. |
| Missing $ inserted. (at a row such as RST_N & LLHH \\) | Signal names are text: escape the underscore, RST\_N, or write the name in maths, $\overline{\textsf{RST}}$. |
| A character such as A, W, E or O draws nothing | It belongs to a library: \usetikztiminglibrary{arrows} (A, W), either (E) or overlays (O). Without it the character is skipped without an error. |
| 8c or 4T draws one long level instead of a clock | A number before a single character is its width. Repeat with braces: 8{c}, 4{T}. |
| Lines and text do not scale with scale=2 | TikZ’s scale leaves line widths and labels unchanged. Use timing/xunit, timing/yunit or timing/font=\Large, or wrap the table in \scalebox{2}{…} (graphicx). |
Frequently asked questions
How do I draw a timing diagram in LaTeX?
Use tikz-timing: \usepackage{tikz-timing}, then \begin{tikztimingtable} Clock & [L] 16{c} \\ Data & 1.5X D{A} D{B} 4.5X \\ \end{tikztimingtable}. Each letter is one period of a logic level: H, L, Z, X, D{value}, C for clock.
How do I draw a clock signal?
Repeat the half-width clock character in braces: 16{c} is eight full cycles (sixteen half periods). Put [L] in front so the first edge is a rising edge at time 0, and load \usetikztiminglibrary[rising arrows]{clockarrows} to mark the edges with arrows (it acts on C-to-C transitions).
How do I write a value on a bus?
Use the data character with the value in braces, 3D{0x1F}, three periods wide. Consecutive values, 2D{A} 2D{B}, get a crossing between them; D{}D forces one between two empty fields.
How do I draw an arrow from one signal edge to another?
Name the edges with N(a) and N(b) in the character strings, then draw in the \extracode part: \draw[->] (a) -- (b);. With \usetikztiminglibrary{advnodes} use anchors such as (a.mid) and (a.TOP).
Is tikz-timing still maintained?
The current version, 0.7f, dates from December 2017 and there has been no release since, but the package is stable and works on current TeX Live (the diagrams on this page were compiled with TeX Live 2026).
References
- tikz-timing package on CTAN (v0.7f, 2017-12-20)ctan.org
- tikz-timing manual (PDF on CTAN)mirrors.ctan.org
- tikz-timing manual, §2.1 Timing characters and modifiersmirrors.ctan.org
- tikz-timing manual, §2.2 \texttiming and §2.3 \timing in TikZ picturesmirrors.ctan.org
- tikz-timing manual, §2.4 Table for timing diagrams (\extracode macros)mirrors.ctan.org
- tikz-timing manual, §3 TikZ keys for styles, settings and actionsmirrors.ctan.org
- tikz-timing manual, §4 Libraries (arrows, either, overlays, clockarrows …)mirrors.ctan.org
- tikz-timing manual, §4.7 Counter charactermirrors.ctan.org
- tikz-timing manual, §4.8 Advanced nodesmirrors.ctan.org
- tikz-timing manual, §5 Examples (SR flip-flop, SPI)mirrors.ctan.org
- tikz-timing repository (GitHub)github.com
- PGF/TikZ manual, §13.3.1 Intersections of Perpendicular Lines (|- and -|)tikz.dev
- PGF/TikZ manual, §74.3 To Path Library: Curves (bend left, bend right)tikz.dev
The facts on this page were checked against these sources, and every picture is the code with it typeset with TeX Live 2026. Code on this page: CC0 1.0, copy it freely.
Try the code in your browserEvery snippet on this page opens in the free TikZ editor: it is typeset with TeX Live as you type, with errors pointed at their line.
Open the TikZ editor