TikZ trees: child syntax, forest and tikz-qtree
Quick answer
\node {A} child { node {B} } child { node {C} };, nested as deep as you need, with level distance (between levels) and sibling distance (between children, both initially 15 mm) to space it. TikZ places children by their number, not their size, so for trees with labels of different widths use the forest package: \begin{forest} [A [B] [C]] \end{forest} packs the tree without overlaps. tikz-qtree’s \Tree [.A B C ] still works but has not changed since 2012.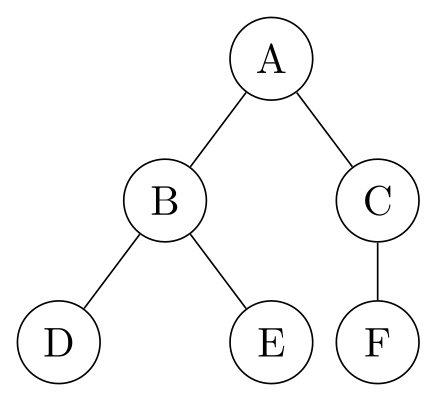
\usepackage{tikz}\begin{tikzpicture}[level distance=12mm, sibling distance=18mm,
every node/.style={circle, draw, minimum size=7mm}]
\node {A}
child { node {B}
child { node {D} }
child { node {E} }
}
child { node {C}
child { node {F} }
};
\end{tikzpicture}Full document
\documentclass[border=4pt]{standalone}
\usepackage{tikz}
\begin{document}
\begin{tikzpicture}[level distance=12mm, sibling distance=18mm,
    every node/.style={circle, draw, minimum size=7mm}]
  \node {A}
    child { node {B}
      child { node {D} }
      child { node {E} }
    }
    child { node {C}
      child { node {F} }
    };
\end{tikzpicture}
\end{document}Contents
Trees with the child syntax
The child operation comes with TikZ, no library needed. After a node, each child { node {…} } adds a child, and children can have children of their own; the whole tree is one path, so there is a single semicolon at the very end. TikZ draws the edges from each parent to its children by itself.
Spacing has two keys. level distance is the distance from a parent to the line of its children, and sibling distance the distance between neighbouring children, measured between their centres; both are initially 15 mm. TikZ positions a child only from its number and the number of its siblings, never from the size of the nodes, which keeps the code simple and predictable but means wide labels can overlap. Then you increase sibling distance, per level as in the next section, or switch to forest.
grow changes the direction: grow=right, grow=up, or an angle such as grow=-30; grow' grows the same way with the children in the opposite order. child[missing] leaves a child’s place empty, which matters for binary trees, where a lone right child must stay on the right.
Spacing and styles per level
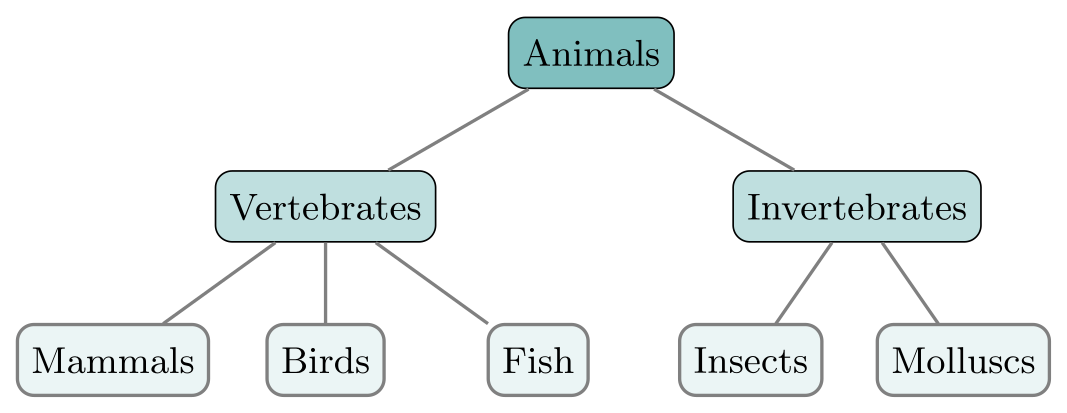
Every set of children runs the style level=n with its level number as #1, and then level n. So level 1/.style={sibling distance=45mm} spreads the first generation wide and level 2/.style={sibling distance=18mm} keeps the grandchildren close, which is the usual cure for overlaps. The same styles colour the levels: nodes={fill=teal!25} inside a level style reaches every node of that level. edge from parent/.style={draw, thick, gray} restyles all edges (keep draw in it, the style’s initial value, or the edges disappear).
\usepackage{tikz}\begin{tikzpicture}[
every node/.style={draw, rounded corners, font=\small, minimum height=6mm},
edge from parent/.style={draw, thick, gray},
level distance=13mm,
level 1/.style={sibling distance=45mm, nodes={fill=teal!25}},
level 2/.style={sibling distance=18mm, nodes={fill=teal!8}}]
\node[fill=teal!50] {Animals}
child { node {Vertebrates}
child { node {Mammals} }
child { node {Birds} }
child { node {Fish} }
}
child { node {Invertebrates}
child { node {Insects} }
child { node {Molluscs} }
};
\end{tikzpicture}Full document
\documentclass[border=4pt]{standalone}
\usepackage{tikz}
\begin{document}
\begin{tikzpicture}[
    every node/.style={draw, rounded corners, font=\small, minimum height=6mm},
    edge from parent/.style={draw, thick, gray},
    level distance=13mm,
    level 1/.style={sibling distance=45mm, nodes={fill=teal!25}},
    level 2/.style={sibling distance=18mm, nodes={fill=teal!8}}]
  \node[fill=teal!50] {Animals}
    child { node {Vertebrates}
      child { node {Mammals} }
      child { node {Birds} }
      child { node {Fish} }
    }
    child { node {Invertebrates}
      child { node {Insects} }
      child { node {Molluscs} }
    };
\end{tikzpicture}
\end{document}Binary trees
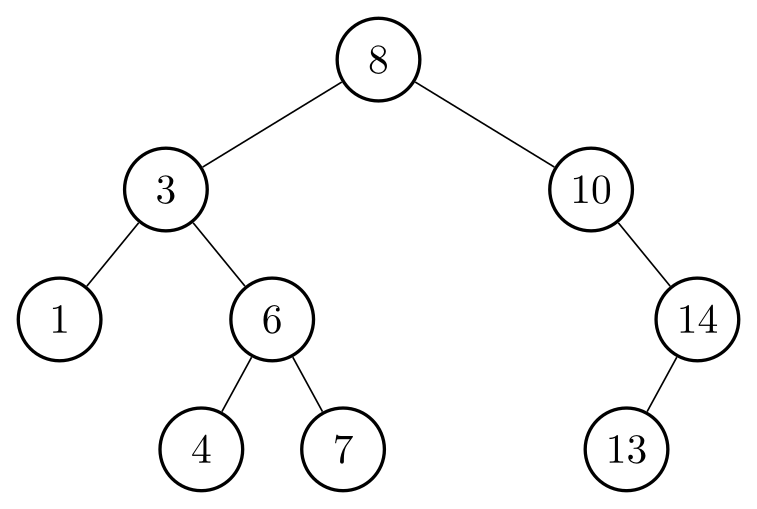
In a balanced binary tree each level needs half the spacing of the one above, and the generic level style does it in one line: level/.style={sibling distance=36mm/#1} gives 36 mm at level 1, 18 mm at level 2 and 12 mm at level 3 (#1 is the level number). For a binary search tree, the side of a child carries meaning: 10 has only a right child, so its left child is written child[missing], which takes the place without drawing anything, and 14 has only a left child. With circle, a fixed minimum size and inner sep=0pt, one- and two-digit keys get circles of the same size.
\usepackage{tikz}\begin{tikzpicture}[level distance=11mm,
level/.style={sibling distance=36mm/#1},
every node/.style={circle, draw, thick, minimum size=7mm, inner sep=0pt}]
\node {8}
child { node {3}
child { node {1} }
child { node {6}
child { node {4} }
child { node {7} }
}
}
child { node {10}
child[missing]
child { node {14}
child { node {13} }
child[missing]
}
};
\end{tikzpicture}Full document
\documentclass[border=4pt]{standalone}
\usepackage{tikz}
\begin{document}
\begin{tikzpicture}[level distance=11mm,
    level/.style={sibling distance=36mm/#1},
    every node/.style={circle, draw, thick, minimum size=7mm, inner sep=0pt}]
  \node {8}
    child { node {3}
      child { node {1} }
      child { node {6}
        child { node {4} }
        child { node {7} }
      }
    }
    child { node {10}
      child[missing]
      child { node {14}
        child { node {13} }
        child[missing]
      }
    };
\end{tikzpicture}
\end{document}Edge styles: forks, directions and labels
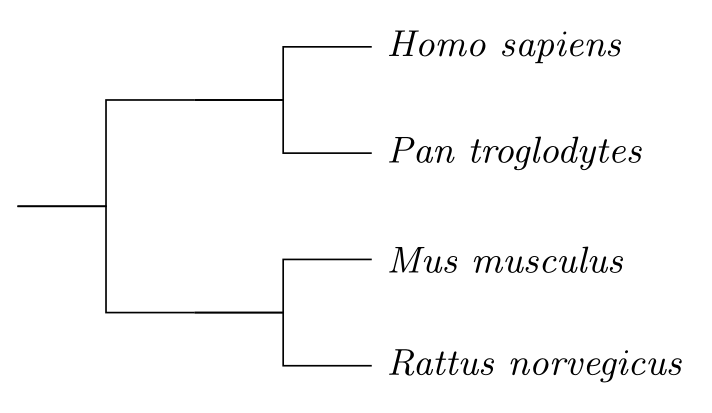
The trees library adds edge styles with right angles: edge from parent fork down runs down for half the level distance and then across, and fork right, fork left and fork up do the same in the other directions. With grow'=right and leaves anchored on their west side, that is a dendrogram or a simple phylogenetic tree; the inner branch points are coordinates instead of nodes, so nothing is drawn there. (grow' rather than grow puts the first child on top.)
For other edge shapes, set edge from parent path, and to label one edge write edge from parent node[left] {yes} after the child’s node, inside its braces. child anchor and parent anchor, initially border, choose where edges meet the nodes, for example parent anchor=south, child anchor=north for straight vertical starts.
\usepackage{tikz} \usetikzlibrary{trees}\begin{tikzpicture}[grow'=right, level distance=15mm,
level 1/.style={sibling distance=18mm},
level 2/.style={sibling distance=9mm},
edge from parent fork right,
leaf/.style={anchor=west, font=\small\itshape}]
\coordinate
child { coordinate
child { node[leaf] {Homo sapiens} }
child { node[leaf] {Pan troglodytes} }
}
child { coordinate
child { node[leaf] {Mus musculus} }
child { node[leaf] {Rattus norvegicus} }
};
\end{tikzpicture}Full document
\documentclass[border=4pt]{standalone}
\usepackage{tikz}
\usetikzlibrary{trees}
\begin{document}
\begin{tikzpicture}[grow'=right, level distance=15mm,
    level 1/.style={sibling distance=18mm},
    level 2/.style={sibling distance=9mm},
    edge from parent fork right,
    leaf/.style={anchor=west, font=\small\itshape}]
  \coordinate
    child { coordinate
      child { node[leaf] {Homo sapiens} }
      child { node[leaf] {Pan troglodytes} }
    }
    child { coordinate
      child { node[leaf] {Mus musculus} }
      child { node[leaf] {Rattus norvegicus} }
    };
\end{tikzpicture}
\end{document}forest: automatic spacing, recommended for most trees
The forest package (version 2.1.5 on CTAN, by Sašo Živanović) builds on TikZ and solves its spacing problem: it measures every node and packs the subtrees as close as they can go without touching. You write the tree as nested brackets, each [ starting a node and its children: [S [NP [Det [the]] [N [cat]]] …]. The text of a node runs to the first comma; anything after a comma is options for that node, so text containing a comma needs braces: [{Smith, 2020}].
Options before the first bracket apply to the whole tree when wrapped in for tree={…}. The spacing keys are l sep, the minimum gap between a node and its children (initially the height of a strut plus inner ysep), and s sep, the minimum gap between neighbouring subtrees (initially twice inner xsep). Unlike TikZ’s distances, both are gaps between node borders, so long labels push their neighbours aside instead of overlapping them. Other useful keys: edge={…} styles the edge to a node, edge label={node[midway, left] {yes}} labels it, grow'=0 grows the tree to the right, and where level=1{fill=…}{} applies options to a level. With \usepackage[linguistics]{forest}, edges run from the bottom of a parent to the top of its child, as linguists expect.
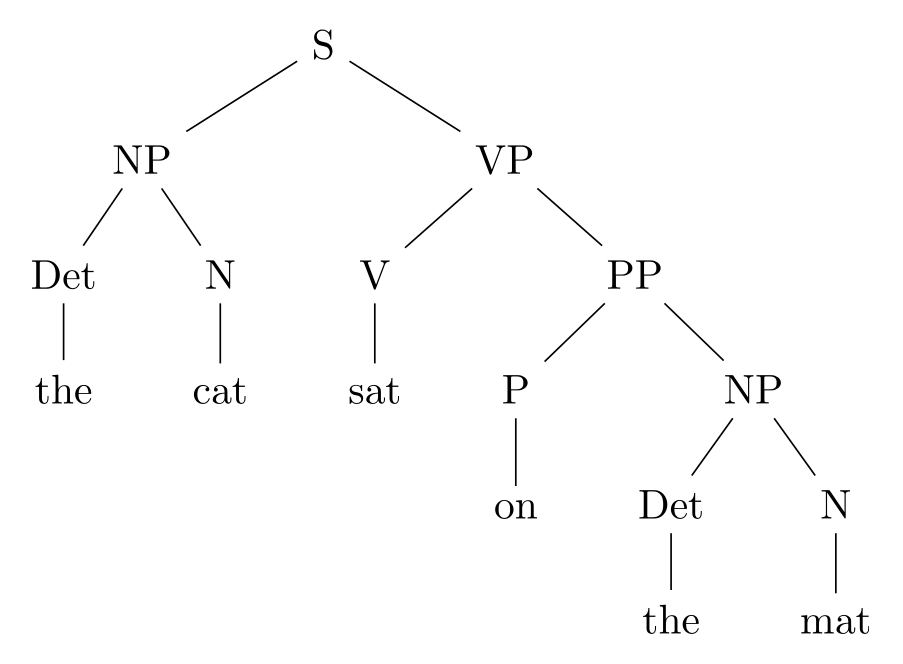
\usepackage{tikz} \usepackage{forest}\begin{forest}
for tree={s sep=6mm, l sep=4mm}
[S
[NP [Det [the]] [N [cat]]]
[VP
[V [sat]]
[PP [P [on]]
[NP [Det [the]] [N [mat]]]]
]
]
\end{forest}Full document
\documentclass[border=4pt]{standalone}
\usepackage{tikz}
\usepackage{forest}
\begin{document}
\begin{forest}
  for tree={s sep=6mm, l sep=4mm}
  [S
    [NP [Det [the]] [N [cat]]]
    [VP
      [V [sat]]
      [PP [P [on]]
          [NP [Det [the]] [N [mat]]]]
    ]
  ]
\end{forest}
\end{document}Org charts and hierarchy diagrams
An organisation chart is a forest tree with boxes and right-angled connectors. forked edges comes from forest’s edges library, which you load in the preamble with \useforestlibrary{edges}; fork sep sets where the fork bends. align=center allows two-line boxes (role and name), minimum width gives the boxes a common width, and where level=0{…}{} and where level=1{…}{} colour the top two levels. forest centres each parent over its children and keeps the boxes apart however long their text gets, which is exactly the part that takes trial and error with sibling distance in plain TikZ.
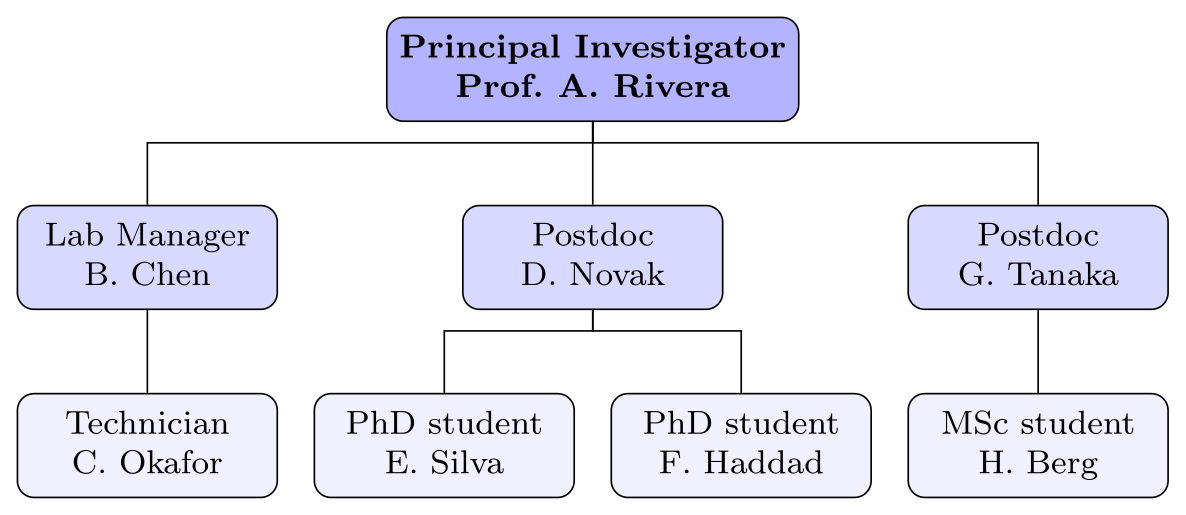
\usepackage{tikz} \usepackage{forest} \useforestlibrary{edges}\begin{forest}
for tree={draw, rounded corners, fill=blue!6, align=center, font=\footnotesize,
minimum width=22mm, inner sep=3pt, s sep=3mm, l sep=7mm},
forked edges,
where level=0{fill=blue!30, font=\footnotesize\bfseries}{},
where level=1{fill=blue!15}{},
[Principal Investigator\\Prof.\ A.\ Rivera
[Lab Manager\\B.\ Chen
[Technician\\C.\ Okafor]
]
[Postdoc\\D.\ Novak
[PhD student\\E.\ Silva]
[PhD student\\F.\ Haddad]
]
[Postdoc\\G.\ Tanaka
[MSc student\\H.\ Berg]
]
]
\end{forest}Full document
\documentclass[border=4pt]{standalone}
\usepackage{tikz}
\usepackage{forest}
\useforestlibrary{edges}
\begin{document}
\begin{forest}
  for tree={draw, rounded corners, fill=blue!6, align=center, font=\footnotesize,
            minimum width=22mm, inner sep=3pt, s sep=3mm, l sep=7mm},
  forked edges,
  where level=0{fill=blue!30, font=\footnotesize\bfseries}{},
  where level=1{fill=blue!15}{},
  [Principal Investigator\\Prof.\ A.\ Rivera
    [Lab Manager\\B.\ Chen
      [Technician\\C.\ Okafor]
    ]
    [Postdoc\\D.\ Novak
      [PhD student\\E.\ Silva]
      [PhD student\\F.\ Haddad]
    ]
    [Postdoc\\G.\ Tanaka
      [MSc student\\H.\ Berg]
    ]
  ]
\end{forest}
\end{document}Directory trees
The folder style from the same edges library draws a file tree: children are listed below their parent, indented, with an L-shaped line to each. grow'=0 makes the tree grow to the right with the children in reading order, folder indent (initially .45em) sets how far the vertical line is moved in from the parent, and l sep and s sep set the indentation and the line spacing.
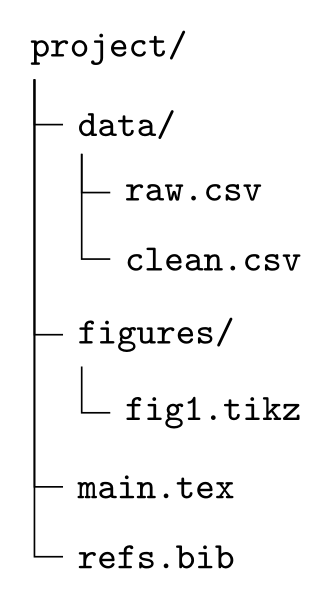
\usepackage{tikz} \usepackage{forest} \useforestlibrary{edges}\begin{forest}
for tree={folder, grow'=0, font=\ttfamily\small, s sep=1.5mm, l sep=4mm},
[project/
[data/
[raw.csv]
[clean.csv]
]
[figures/
[fig1.tikz]
]
[main.tex]
[refs.bib]
]
\end{forest}Full document
\documentclass[border=4pt]{standalone}
\usepackage{tikz}
\usepackage{forest}
\useforestlibrary{edges}
\begin{document}
\begin{forest}
  for tree={folder, grow'=0, font=\ttfamily\small, s sep=1.5mm, l sep=4mm},
  [project/
    [data/
      [raw.csv]
      [clean.csv]
    ]
    [figures/
      [fig1.tikz]
    ]
    [main.tex]
    [refs.bib]
  ]
\end{forest}
\end{document}Decision trees
A decision tree has questions in its inner nodes, answers on its edges and outcomes at its leaves. In forest, styles can be declared before the tree and used like options: here test for the questions, leaf=green for outcomes (a style with a colour parameter, leaf/.style={draw, fill=#1!25}), and yes and no, which set edge label to a node at the middle of the edge. The question texts are wrapped in braces, a safe habit for any node text with maths, line breaks or punctuation, and the default calign=center keeps each question centred over its two answers.
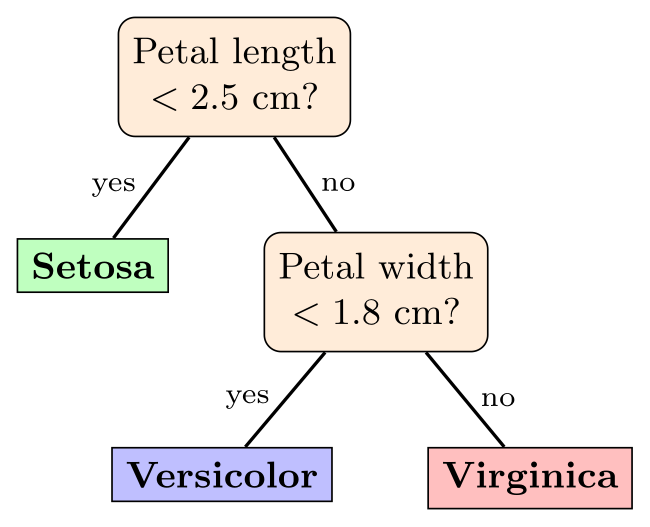
\usepackage{tikz} \usepackage{forest}\begin{forest}
test/.style={draw, rounded corners, fill=orange!15, align=center},
leaf/.style={draw, fill=#1!25, font=\bfseries\small},
yes/.style={edge label={node[midway, left, font=\scriptsize] {yes}}},
no/.style={edge label={node[midway, right, font=\scriptsize] {no}}},
for tree={font=\small, s sep=8mm, l sep=8mm, edge={thick}},
[{Petal length\\$< 2.5$ cm?}, test
[Setosa, leaf=green, yes]
[{Petal width\\$< 1.8$ cm?}, test, no
[Versicolor, leaf=blue, yes]
[Virginica, leaf=red, no]
]
]
\end{forest}Full document
\documentclass[border=4pt]{standalone}
\usepackage{tikz}
\usepackage{forest}
\begin{document}
\begin{forest}
  test/.style={draw, rounded corners, fill=orange!15, align=center},
  leaf/.style={draw, fill=#1!25, font=\bfseries\small},
  yes/.style={edge label={node[midway, left, font=\scriptsize] {yes}}},
  no/.style={edge label={node[midway, right, font=\scriptsize] {no}}},
  for tree={font=\small, s sep=8mm, l sep=8mm, edge={thick}},
  [{Petal length\\$< 2.5$ cm?}, test
    [Setosa, leaf=green, yes]
    [{Petal width\\$< 1.8$ cm?}, test, no
      [Versicolor, leaf=blue, yes]
      [Virginica, leaf=red, no]
    ]
  ]
\end{forest}
\end{document}tikz-qtree (older, still searched)
tikz-qtree brings the bracket syntax of the old qtree package to TikZ: \Tree [.S [.NP the cat ] [.VP sat ] ], where [.label starts a subtree and every label must be followed by a space, including the last one before ]. It lays trees out without collisions and accepts TikZ options for the whole tree (level distance, sibling distance, which here is the gap between subtrees rather than between centres), styles such as every tree node, every leaf node and every level 1 node, and \edge[roof]; for a triangle over a phrase.
Its status: version 1.2 is from April 2012 and has not been updated since. It is still in TeX Live and MiKTeX and works, as this render shows, so existing documents need no change. For new trees, forest does everything tikz-qtree does (the same tree in forest is shown above) and adds automatic packing that takes the node sizes into account, styles per level and node, and a maintained, documented code base.
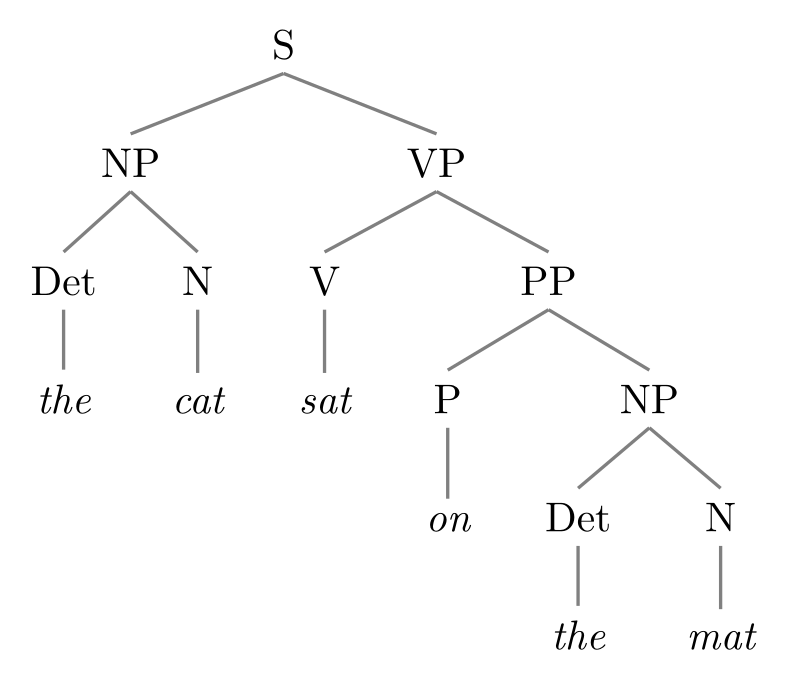
\usepackage{tikz} \usepackage{tikz-qtree}\begin{tikzpicture}[level distance=10mm, sibling distance=4mm,
edge from parent/.append style={thick, gray}]
\tikzset{every leaf node/.style={font=\itshape}}
\Tree [.S [.NP [.Det the ] [.N cat ] ]
[.VP [.V sat ]
[.PP [.P on ]
[.NP [.Det the ] [.N mat ] ] ] ] ]
\end{tikzpicture}Full document
\documentclass[border=4pt]{standalone}
\usepackage{tikz}
\usepackage{tikz-qtree}
\begin{document}
\begin{tikzpicture}[level distance=10mm, sibling distance=4mm,
    edge from parent/.append style={thick, gray}]
  \tikzset{every leaf node/.style={font=\itshape}}
  \Tree [.S [.NP [.Det the ] [.N cat ] ]
            [.VP [.V sat ]
                 [.PP [.P on ]
                      [.NP [.Det the ] [.N mat ] ] ] ] ]
\end{tikzpicture}
\end{document}Radial trees and mind maps
grow cyclic from the trees library spreads children around their parent instead of along a line: sibling angle is the angle between neighbours, set per level, so 72° places five children all around the root. child foreach \topic/\a/\b in {…} creates one child per list item, with nested children from the same item. For mind maps with tapered, coloured connections, the mindmap library builds on the same idea with its own concept styles.
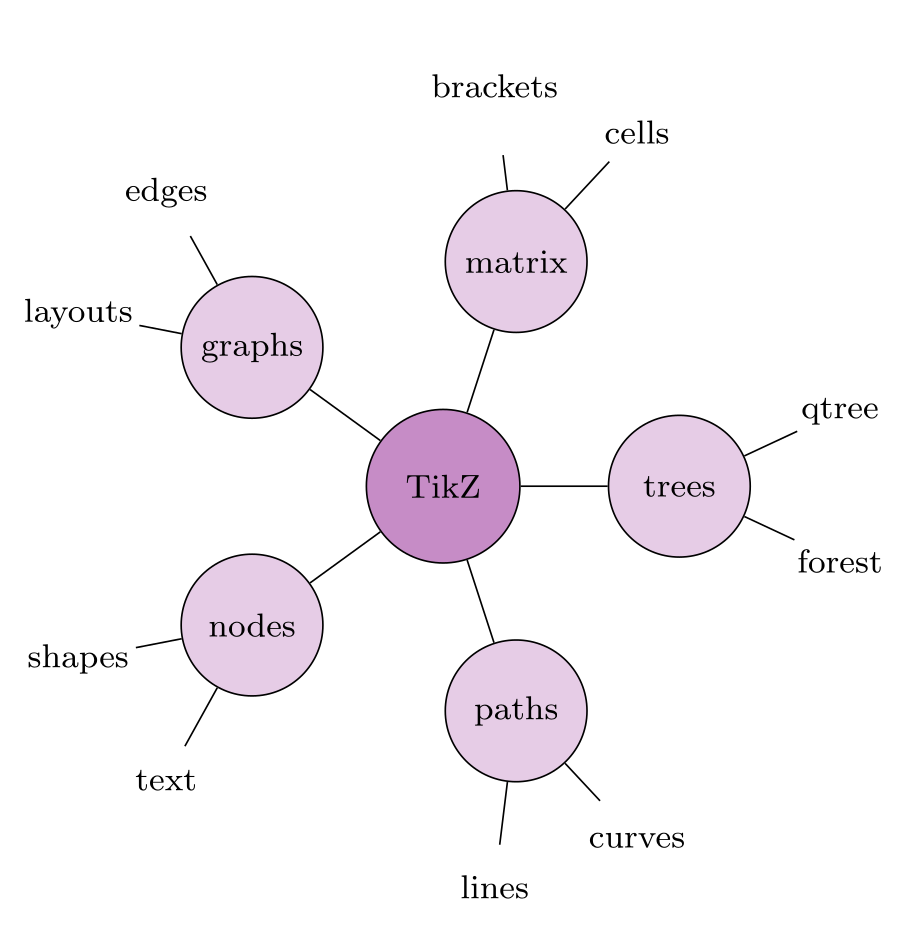
\usepackage{tikz} \usetikzlibrary{trees}\begin{tikzpicture}[grow cyclic, font=\footnotesize,
level 1/.style={level distance=20mm, sibling angle=72,
nodes={circle, draw, fill=violet!20, minimum size=12mm}},
level 2/.style={level distance=15mm, sibling angle=50,
nodes={draw=none, fill=none, minimum size=0pt, inner sep=1pt}}]
\node[circle, draw, fill=violet!45, minimum size=13mm] {TikZ}
child foreach \topic/\a/\b in {nodes/shapes/text, paths/lines/curves,
trees/forest/qtree, matrix/cells/brackets, graphs/edges/layouts} {
node {\topic}
child { node {\a} }
child { node {\b} }
};
\end{tikzpicture}Full document
\documentclass[border=4pt]{standalone}
\usepackage{tikz}
\usetikzlibrary{trees}
\begin{document}
\begin{tikzpicture}[grow cyclic, font=\footnotesize,
    level 1/.style={level distance=20mm, sibling angle=72,
                    nodes={circle, draw, fill=violet!20, minimum size=12mm}},
    level 2/.style={level distance=15mm, sibling angle=50,
                    nodes={draw=none, fill=none, minimum size=0pt, inner sep=1pt}}]
  \node[circle, draw, fill=violet!45, minimum size=13mm] {TikZ}
    child foreach \topic/\a/\b in {nodes/shapes/text, paths/lines/curves,
        trees/forest/qtree, matrix/cells/brackets, graphs/edges/layouts} {
      node {\topic}
        child { node {\a} }
        child { node {\b} }
    };
\end{tikzpicture}
\end{document}Automatic tree layouts (LuaLaTeX)
The graph drawing library has proper tree algorithms too: with \usetikzlibrary{graphdrawing}, \usegdlibrary{trees} and LuaLaTeX, adding tree layout to a child tree or a \graph places it with the Reingold–Tilford method, which takes node sizes into account. It is an option when you already compile with LuaLaTeX; forest works with every engine. See TikZ graphs for the graph drawing setup.
Common errors and how to fix them
| LaTeX says (or you see) | Cause and fix |
|---|---|
| Environment forest undefined. | Load the package: \usepackage{forest}. It loads TikZ itself. |
| Package pgfkeys Error: I do not know the key '/tikz/2020' and I am going to ignore it. Perhaps you misspelled it. | In forest, a comma ends the node text and starts its options, so [Smith, 2020] passes 2020 as an option. Put text with commas in braces: [{Smith, 2020}]. |
| Package pgfkeys Error: I do not know the key '/tikz/forked edges' and I am going to ignore it. Perhaps you misspelled it. | forked edges and folder are in forest’s edges library: add \useforestlibrary{edges} to the preamble (or \usepackage[edges]{forest}). |
| Package pgfkeys Error: I do not know the key '/tikz/edge from parent fork down' and I am going to ignore it. Perhaps you misspelled it. | The fork edge styles and grow cyclic come from \usetikzlibrary{trees}. |
| Paragraph ended before \@@label was complete. | In tikz-qtree, every label needs a space after it, including the last one before a closing bracket: [.NP the cat ] instead of [.NP the cat]. |
| A child has no edge to its parent (no error) | A semicolon inside child { node {A}; } ends the path there, so the edge to A is never drawn. The whole tree is one path: put a single ; after the last child. |
| Nodes of a TikZ tree overlap (no error) | TikZ spaces children by their number, not their size. Set sibling distance per level (level 1/.style={sibling distance=40mm}) or switch to forest, which measures the nodes. |
Frequently asked questions
How do I draw a tree in TikZ?
Write a node followed by its children: \node {root} child { node {A} } child { node {B} child { node {C} } };. Set level distance and sibling distance (both 15 mm by default) in the tikzpicture options, per level with level 1/.style={sibling distance=40mm}. For automatic spacing, use the forest package.
Should I use forest or tikz-qtree?
Use forest for new documents: it packs trees by the real size of the nodes, styles levels and single nodes, and has libraries for org charts (forked edges) and directory trees (folder). tikz-qtree still compiles and its \Tree [.S … ] syntax is short, but version 1.2 dates from 2012 and it has fewer layout controls.
How do I change the distance between levels and siblings in a TikZ tree?
level distance sets the distance from a parent to its children, sibling distance the distance between neighbouring children. Give them in the picture options for the whole tree, in level n/.style for one level, or as child[sibling distance=…] for one child. In forest, use l sep and s sep, which are gaps between node borders.
How do I draw an org chart or hierarchy diagram in LaTeX?
Use forest with \useforestlibrary{edges}: for tree={draw, rounded corners, align=center} styles the boxes, forked edges draws the right-angled connectors, and \\ inside a node gives two lines such as role and name. where level=0{…}{} styles the top box.
How do I draw a binary tree with an empty left child?
In the child syntax, write child[missing] for the empty place: \node {10} child[missing] child { node {14} };. It keeps 14 on the right. In forest, add an empty node with phantom: [10 [,phantom] [14]].
How do I make a tree grow to the right or upwards?
In TikZ, use grow=right or grow=up (grow' reverses the order of the children). In forest, grow=east or grow'=0 for a tree growing to the right; tikz-qtree accepts grow=right, left, up or down.
References
- PGF/TikZ manual, §21 Making Trees Grow (child, level distance, sibling distance, grow)tikz.dev
- PGF/TikZ manual, §21.4 Specifying Options for Trees and Children (level styles)tikz.dev
- PGF/TikZ manual, §21.5 Placing Child Nodes (missing children)tikz.dev
- PGF/TikZ manual, §21.6 Edges From the Parent Nodetikz.dev
- PGF/TikZ manual, §76 Tree Library (grow cyclic, edge from parent fork)tikz.dev
- PGF/TikZ manual, §30 Graph Drawing Layouts: Treestikz.dev
- PGF/TikZ manual, §60 Mindmap Drawing Librarytikz.dev
- forest 2.1.5 on CTAN (2017-07-14; manual: forest-doc.pdf, edges library in §4.2)ctan.org
- forest manual on tikz.dev, §4.2 edges library (forked edges, folder)tikz.dev
- tikz-qtree 1.2 on CTAN (22 April 2012; manual: tikz-qtree-manual.pdf)ctan.org
- pgf package (TikZ) 3.1.12 on CTAN, with the full manual as PDFctan.org
The facts on this page were checked against these sources, and every picture is the code with it typeset with TeX Live 2026. Code on this page: CC0 1.0, copy it freely.
Try the code in your browserEvery snippet on this page opens in the free TikZ editor: it is typeset with TeX Live as you type, with errors pointed at their line.
Open the TikZ editor